- An introduction to Intel Alder Lake and the Core i5-12600K
- Alder Lake Voltage Characteristics
- Baseline, Test-Setup and Overclocking
- Final overclocking results
- Summary
1. An introduction to Intel Alder Lake and the Core i5-12600K
With the launch of its Alder Lake hybrid core architecture in November 2021, Intel finally brought back some serious competition to the CPU market space. Alder Lake is nothing like we've seen before and, for the first time ever, features two different types of cores in a single CPU.
A set of powerful performance cores (short: P-Cores) is accompanied by a group of less powerful efficiency cores (short: E-Cores). The main Idea behind this major change in chip design is, that the powerful P-Cores are responsible for more demanding tasks, like gaming, while the E-Cores handle all the background stuff that's running which could be a web browser, some video playback, or discord. This approach should free some resources of the P-Cores, allowing for better utilization and optimization in general, leading to performance improvements in all types of workloads.
Alder Lake also sets a new standard in I/O and memory capabilities, being the very first to support PCIe 5.0 as well as both DDR4 and also the new DDR5 standard, depending on what motherboard you are using the CPU with. With Alder Lake, Intel also introduced the new LGA1700 socket and the 600 series chipset.


Another difference between the two core types is, that only P-Cores do support hyperthreading, while E-Cores do not. This results in some interesting core configurations.
Currently, there are three K-SKU CPUs of which the i9-12900K represents the flagship of the lineup, featuring 8P+8E-Cores, resulting in a 16C/24T configuration, followed by the i7-12700K with 8P+4E-Cores and 20 threads respective, and the CPU we are focusing on in this article, the i5-12600K with 6P+4E-Cores and a total of 16 threads.
i5-12600K: Clocks, Power and Price
The i5-12600K runs its six performance cores with a base clock of 3.7 GHz, which boost to up to 4.5 GHz on all cores and reaches a maximum of 4.9 GHz in single threaded workloads. The four efficiency cores can boost from a 2.8 GHz base to a max clock of 3.6 GHz. Intel specifies the maximal power draw during boosts with 150 watt for the i5, which it will definitely reach under heavier workloads. At the time of writing, the smallest K-SKU will set you back around 300 USD or (300 EUR in Europe), which means it competes head to head with AMDs alternative, the Ryzen 5 5600X which is sitting at a similar price level of about 270 USD.
2. Alder Lake Voltage Characteristics
There are a lot of different voltages you can adjust on an Alder Lake processor, but for basic overclocking on ambient temperatures, there is really only one voltage you need to change which is VccIA, because this one is the responsible voltage for powering all P- and E-Cores as well as the Ring. VccIA means Intel Alder Lake Voltage and will be referred to as CPU core voltage or simply VCORE in your motherboards BIOS.

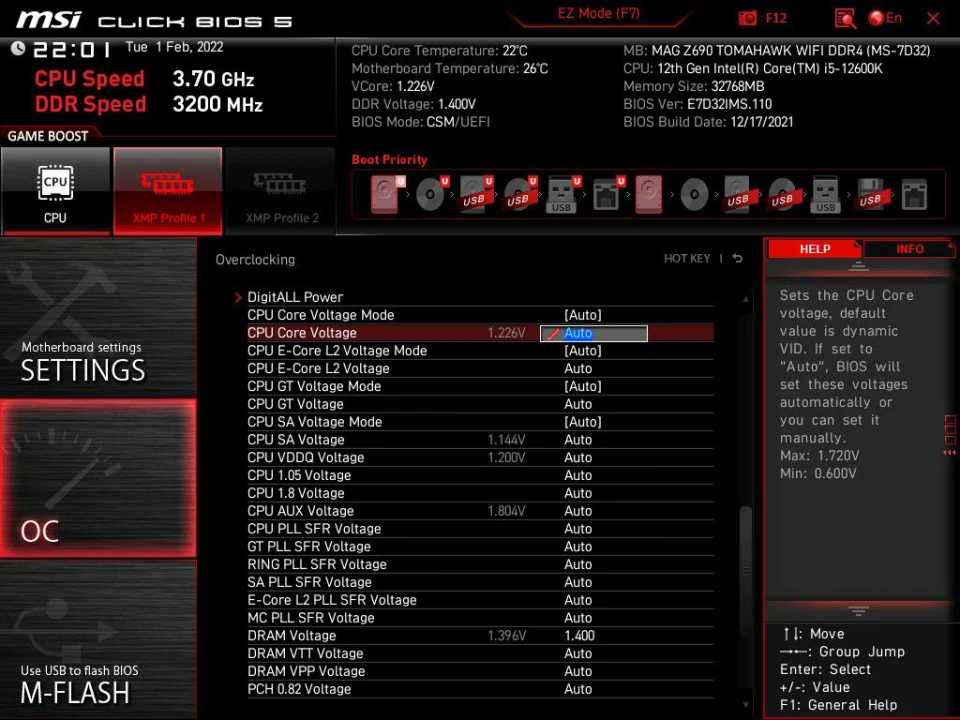

Voltage modes and the Voltage/Frequency curve
By default, the 12600K and all other Alder Lake CPUs have two different ways to set the voltage, which is either adaptive or override mode.
Override mode will run a static voltage no matter what clock ratio or workload the CPU is running currently. This is only really useful if you are going for a static all-core overclock or, you have more extreme overclocking ambitions with dry ice or liquid nitrogen cooling.
Adaptive mode, which is the default operating mode, will adapt the core voltage based on what ratio the CPU is currently running. These voltages are configured in the so-called voltage/frequency curve (short: v/f curve) which defines fixed voltage levels that are mapped against certain core ratios.

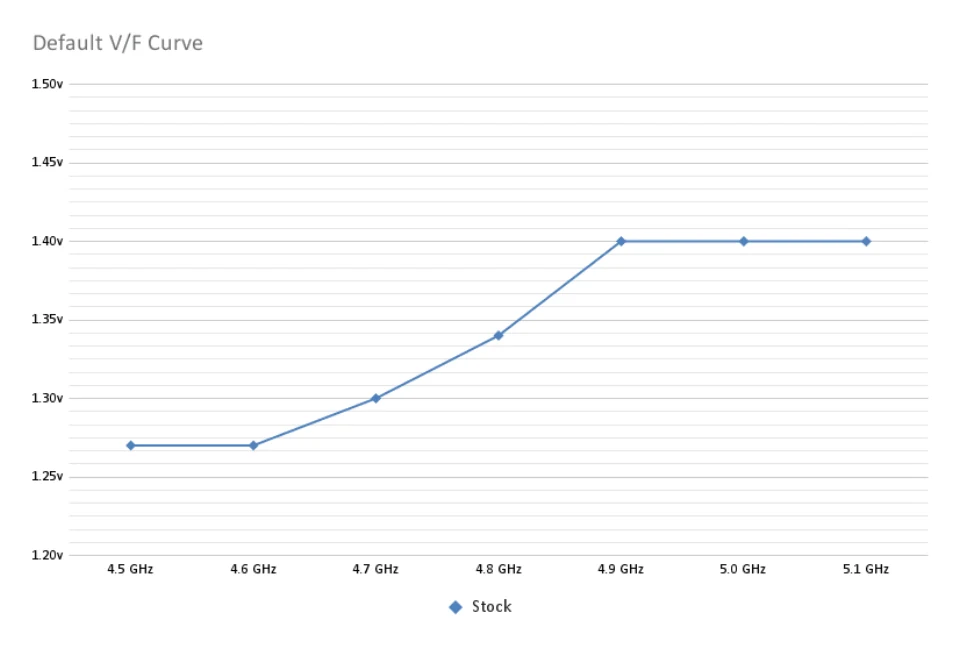

The v/f curve does only specify the voltage for a few fixed core ratios, while the voltage for all the other ratios is calculated from two neighboring points on the curve.
When manually setting a core voltage while in adaptive mode, this voltage will be used for the highest specified core ratio only. It won't however change the voltage for all the stock ratios that are already defined from the factory, they will still use the value from the v/f curve.
For example, if we set a core ratio of let's say x51 and a core voltage of 1.45v, the CPU will still use the default core voltage for all ratios up to the max stock ratio, which is x49 on the 12600K. For the x51 ratio, 1.45v will be used, while for x50, the voltage will be calculated based on the voltages of the x49 and x51 ratio (which means it will be something in between these two voltages) and could be something like 1.425v in this example.

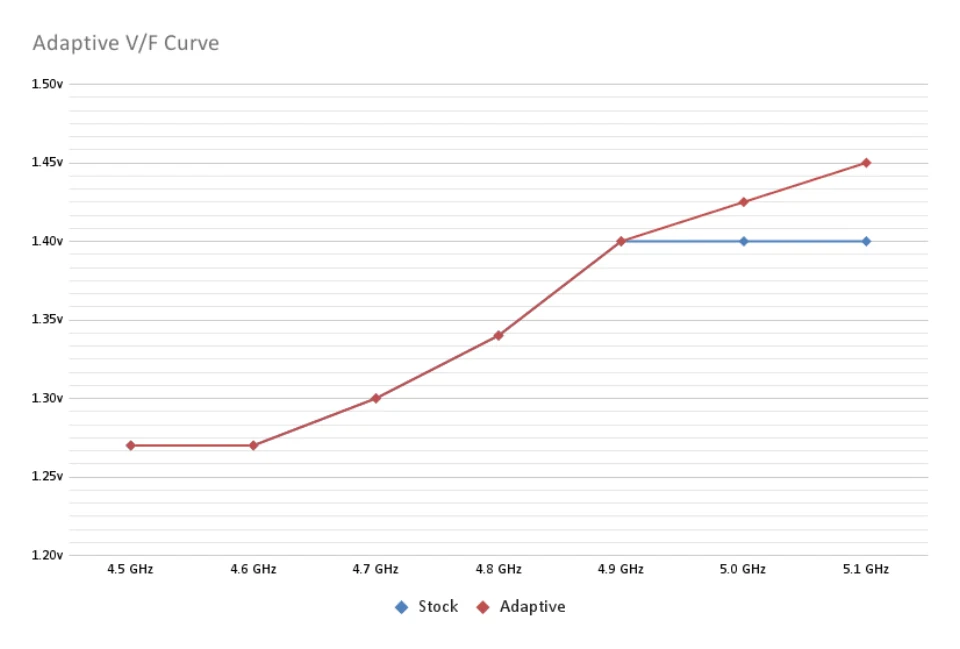

Different BIOS voltage settings
Depending on your motherboards brand, you may miss some of the settings I am describing here, or they are named a bit differently.
Although I previously wrote that there are only two different operating modes regarding the core voltage for an Alder Lake processor, your motherboard will offer you some additional settings to give you more granular control over the CPU core voltage. These settings are just some variations of the two modes and will not alter the core behavior behind them.

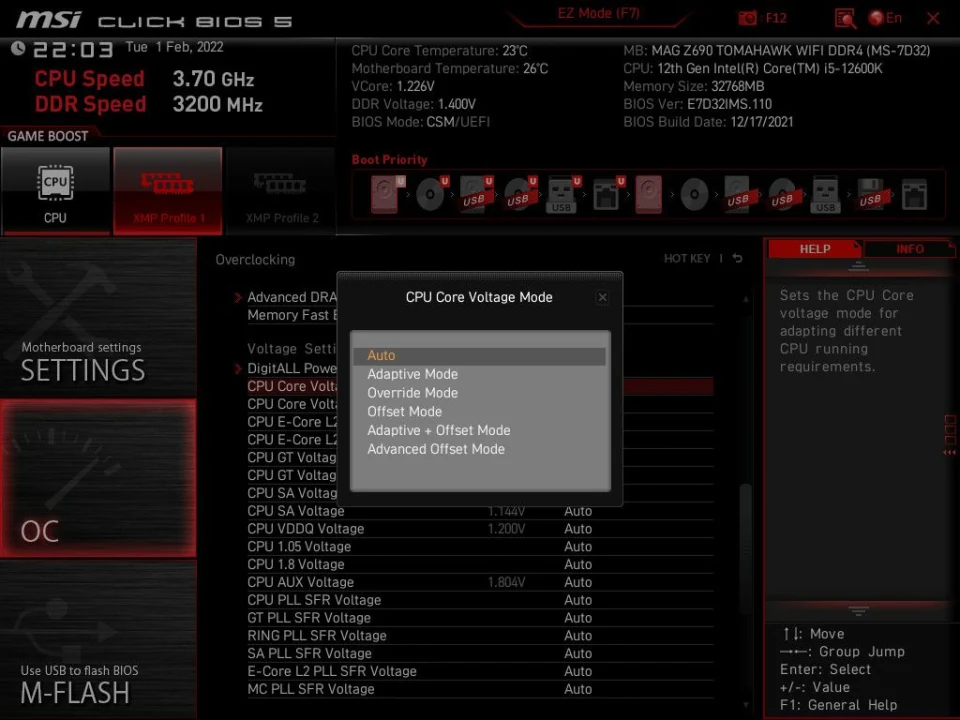

Auto: This will default to Adaptive Mode.
Adaptive Mode: The CPU will use the voltage specified in the v/f curve depending on which ratio the CPU is currently running. You can specify a voltage that will be used for the highest core ratio. The voltages between the highest stock ratio and the highest OC ratio will be interpolated automatically.
Override Mode: The CPU will use a static voltage no matter what ratio the CPU is currently running.
Offset Mode: The CPU will run the same voltage as in Adaptive Mode, plus or minus a manually specified offset value. With Offset Mode, you can basically shift the whole v/f curve up or down, depending on if you use a positive or negative offset. You cannot manually specify a certain voltage for the highest OC ratio, however.
Adaptive + Offset Mode: This mode lets you combine Adaptive and Offset Mode. You can specify a voltage to be used for the highest core ratio, as well as an offset value to shift the final v/f curve up or down.
Advanced Offset Mode: In this mode you can manually define the voltages of the v/f curve as well as for the highest OC ratio, giving you just a little more granularity than Adaptive + Offset Mode. Still, you cannot specify the voltages for the ratios between the max stock and the max OC ratio.

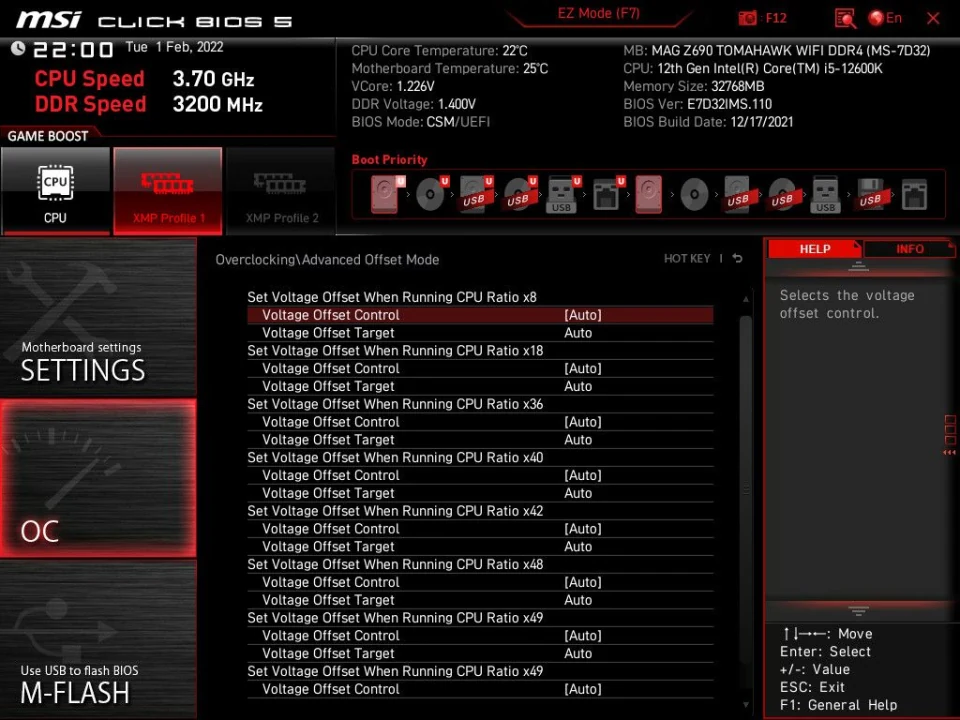

MSI CPU Lite Load
I also want to mention a setting called CPU Lite Load, which is an MSI specific BIOS setting, that adjusts the CPU Core voltage based on the mode you choose. Left on auto, the motherboard will automatically choose a mode that should guarantee stability for your CPU by adding some amount of VCORE. In my case, the auto setting defaulted to mode 9, but for manually overclocking purposes, I recommend setting this to mode 1 as it basically does nothing special other than applying an offset to the CPU core voltage. It is easy to overlook this setting, and could potentially lead to really high voltages if it's set to a very high mode while having a manually set CPU core voltage. I've also verified this by running some tests with a fixed VCORE of 1.40V and different LLC settings to see how it behaves.
| CPU Lite Load Mode 1 | Idle voltage | Load voltage | VDroop |
|---|---|---|---|
| LLC Mode 2 | 1.380v | 1.33v | 50mv |
| LLC Mode 4 | 1.375v | 1.30v | 75mv |
| LLC Mode 6 | 1.370v | 1.27v | 100mv |
| CPU Lite Load Mode 4 | Idle voltage | Load voltage | VDroop |
|---|---|---|---|
| LLC Mode 2 | 1.430v | 1.38v | 50mv |
| LLC Mode 4 | 1.425v | 1.35v | 75mv |
| LLC Mode 6 | 1.420v | 1.32v | 100mv |
Changing Lite Load from mode 1 to mode 4 added an offset of 50mv to the CPU core voltage in IDLE as well as under load, which can actually be quite dangerous given the motherboard set this setting to mode 9 by default for my 12600K. I think it will be confusing and misleading for some people if the motherboard does not behave as you would expect and suddenly uses higher voltages.
3. Baseline, Test-Setup and Overclocking
Before starting to overclock the 12600K, I've run a set of benchmarks with the CPU at default settings to establish a baseline to compare our overclocked system against. I am using an MSI Z690 Tomahawk WI-FI DDR4 motherboard combined with a pair of 16 GB G.Skill Rip Jaws V dual ranked DDR4 dimms, running at 3200Mbps CL14-14-14-36 1T in Gear1 mode with manually tuned sub-timings in all my tests. The CPU short and long duration power limits were maxed out to 4096W for all tests. Each score represent the average out of three runs.
| Benchmark | 12600K Stock |
|---|---|
| HWBOT x265 1080P | 89.6 FPS |
| HWBOT x265 4K | 21.6 FPS |
| Cinebench R23 | 16 353 |
| Cinebench R23 Single | 1 762 |
| 7z Compression | 83 987 MIPS |
| 7z Decompresssion | 96 077 MIPS |
| 3DMark 11 CPU | 23 919 |
| 3DMark Firestrike CPU | 29 486 |
| 3DMark Timespy CPU | 13 349 |
| 3DMark CPU Profile Max | 8 027 |
| 3DMark CPU Profile 16 | 8 016 |
| 3DMark CPU Profile 8 | 6 368 |
| 3DMark CPU Profile 4 | 3 990 |
| 3DMark CPU Profile 2 | 2 074 |
| 3DMark CPU Profile 1 | 1 030 |
| Blender BMW | 143.0s |
| Blender Classroom | 389.7s |
| V-Ray 5.020 | 11 959 |
| SPI 1M | 7.3s |
| SPI 32M | 346.3s |
| wPrime 1024M | 67.1s |
| y-cruncher 1B | 37.08s |
The highest observed power draw was 184W, measured on the EPS 12V cable. The highest voltage during load as reported by HWINFO was 1.40V with stock settings during single core boost periods.
The Overclocking Process
Before overclocking your CPU, make sure your cooling solution is up for the task. I am using a 420 mm AIO running maxed out at 100% with temperatures reaching the high 80s with a maximum of 96 °C during the heaviest workloads.
There are different approaches you can take when it comes to overclocking the 12600K. The easiest way would be to just set a fixed all-core ratio for the P-Cores and E-Cores. You should be able to run a ratio of x49 or x50 on the P-Cores and x39 or x40 on the E-Cores without the need to touch the voltage settings, as the v/f curve already specifies voltages up to x49. However, you will leave some performance on the table in less threaded workloads because you are not taking advantage of Intels turbo boost technology.
A more optimal approach is to manually tune the turbo ratios of the CPU to be able to run high all-core as well as high boost clocks and therefore maximize performance gains. This is also the method I'm using for overclocking my 12600K.
First I like to find the max stable clock for the E-Cores and the Ring, and then continue with the P-Cores afterwards.
x40 was the max ratio the E-Cores could do without crashing, and the limit for the Ring ratio was x43. Remember that at this point, I haven't touched the voltage at all, as the default v/f curve is still able to manage those lower ratios just fine. For the E-Cores, I decided to stick to a simple all-core overclock, because they will not impact overall performance too much. If you like, you can come back later and try to dial in a turbo ratio OC for them as well.
Finding the right voltage level
With the E-Cores and Ring ratios set, it's time to start working on the P-Core overclock by setting the voltage mode to adaptive, and entering a reasonable high core voltage. Remember that by default, the v/f curve already uses about 1.40V for the highest stock ratio of x49, so setting it to anything less than that will not help at all.
I started out with a slight bump to 1.45V and learned that the max stable all-core ratio for the P-Cores across all tests is x50. Although I was able to run some benchmarks with x51 across all cores, the system did crash sometimes while running very heavy workloads such as y-cruncher.
If you have trouble getting your overclock stable or some occasional crashes, try to adjust LLC (load line calibration) settings to decrease voltage drop during load and improve stability. Keep in mind however that it's not recommended to max out your LLC setting, as this can actually lead to worse stability. I ended up using LLC Mode 3, which is a modarate to high LLC in the MSI BIOS.
Fine-tuning the P-Cores
Having the max all-core ratio figured out and the voltage and LLC dialed in, it's time to start adjusting the turbo ratios for the specific core usages. We can specify a different ratio for each number of active P-Cores allowing us to achieve much higher boost clocks during less thread-heavy workloads, such as most gaming, compared to the static all-core overclock.
I's a bit trial and error to find out what turbo ratios work, but I figured a good place to start is to use the maximum offset you were able to achieve for your all-core OC compared to the stock ratio, which in my case was four (x46 stock vs. x50 OC). From there you can try to further increase the turbo ratios or adjust where needed.
Avoiding the v/f curve trap
At this point, it is very important to remember how the v/f curve works, because increasing the turbo ratio can have a negative impact on your all-core overclock. This is due to the fact, that the voltage for all ratios between the highest stock and the highest OC ratio is calculated from the voltages of these two ratios. For example, if you have 1.45v set with a x50 all-core overclock, then 1.45v will be used for this ratio because it's the highest OC ratio. Once you start increasing the individual turbo ratios, you could end up with maybe x53 being the highest OC ratio. At this point, the specified voltage of 1.45v will now be used for the x53 turbo ratio, while the voltage for the x50 all-core ratio will be a calculated value and therefore lower.
| Ratio | Voltage |
|---|---|
| x49, max stock ratio | 1.400 (factory v/f setting) |
| x50, max OC ratio | 1.450 (user defined voltage) |
| Ratio | Voltage |
|---|---|
| x49, max stock ratio | 1.400 (factory v/f setting) |
| x50 | 1.413 |
| x51 | 1.425 |
| x52 | 1.438 |
| x53, max OC ratio | 1.450 (user defined voltage) |
As you can see in the tables above, the voltage for the x50 ratio is significantly lower now when running higher turbo ratios.
To fix that you can simply switch to adaptive + offset Mode and set a new voltage of 1.40v with a +0.05v offset for example. Now the whole v/f curve will be shifted up by 50mv, resulting in a voltage of 1.45v for x49 and all ratios above. However, if you decide to increase the voltage further, e.g. if you want to push your single core turbo ratio higher, this will affect your all-core voltage as well.

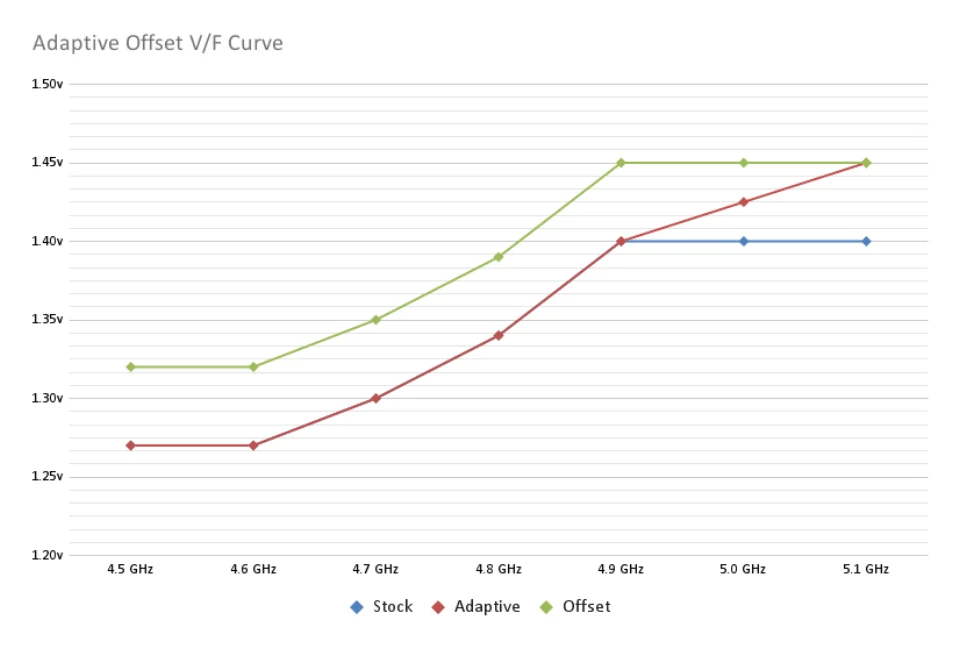

The last thing you can do is to use advanced offset mode, and manually set the voltage for the highest stock ratio. Then you would still be able to increase the voltage for the highest OC ratio, without too much effect on the all-core voltage. The behavior would be the same as in adaptive mode, just with an increased voltage for the highest stock ratio.

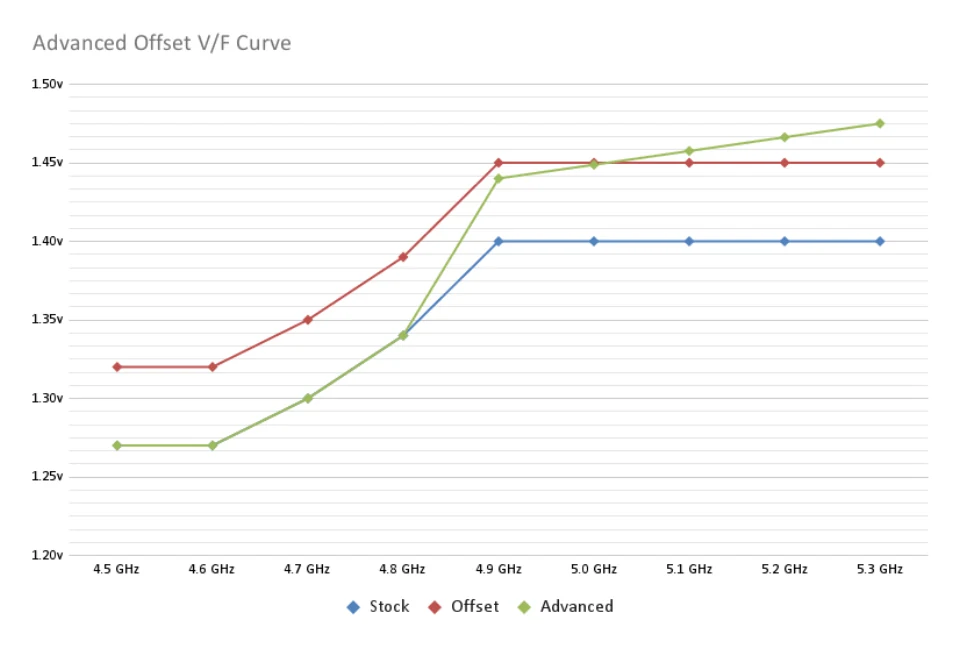

4. Final overclocking results
After having reworked the VCORE settings to ensure stability in all-core as well as single core boost scenarios, this is the final turbo ratio overclock I was able to achieve and run through all the benchmark tests.
| Stock | OC | |
|---|---|---|
| 1 active P-Core | x49 | x53 (+4) |
| 2 active P-Cores | x49 | x52 (+3) |
| 3 active P-Cores | x47 | x51 (+4) |
| 4 active P-Cores | x47 | x51 (+4) |
| 5 active P-Cores | x45 | x51 (+6) |
| 6 active P-Cores | x45 | x50 (+5) |
As you can see, with turbo ratio overclocking I was able to achieve 300 MHz higher clocks at best in certain load scenarios compared to the initial all-core overclock and up to 600 MHz compared to stock. Quite an improvement I would say.
My final settings are as follows:
| Voltage Mode | Adaptive + Offset |
| CPU Core Voltage | 1.40v |
| CPU Core Voltage Offset | +0.05v |
| LLC Setting | Mode 3 |
| CPU LIte Load | Mode 1 |
| RIng Ratio | x43 |
| E-Core Ratio | x40 |
Benchmark results
With the dialed in overclock, I reran the benchmark suite to see how much of a performance uplift the overclock actually yields.
| Benchmark | 12600K Stock | 12600K OC |
|---|---|---|
| HWBOT x265 1080P | 89.6 FPS | 97.7 FPS |
| HWBOT x265 4K | 21.6 FPS | 23.6 FPS |
| Cinebench R23 | 16 353 | 18 029 |
| Cinebench R23 Single | 1 762 | 1 897 |
| 7z Compression | 83 987 MIPS | 87,101 MIPS |
| 7z Decompresssion | 96 077 MIPS | 104,816 MIPS |
| 3DMark 11 CPU | 23 919 | 26 715 |
| 3DMark Firestrike CPU | 29 486 | 32 961 |
| 3DMark Timespy CPU | 13 349 | 14 663 |
| 3DMark CPU Profile Max | 8 027 | 9 041 |
| 3DMark CPU Profile 16 | 8 016 | 9 042 |
| 3DMark CPU Profile 8 | 6 368 | 7 195 |
| 3DMark CPU Profile 4 | 3 990 | 4 337 |
| 3DMark CPU Profile 2 | 2 074 | 2 217 |
| 3DMark CPU Profile 1 | 1 030 | 1 119 |
| Blender BMW | 143.0s | 127.0s |
| Blender Classroom | 389.7s | 348.0s |
| V-Ray 5.020 | 11 959 | 13 377 |
| SuperPi 1M | 7.3s | 6.8s |
| SuperPi 32M | 346.3s | 322.7s |
| wPrime 1024M | 67.1s | 59.0s |
| y-cruncher 1B | 37.08s | 34.81s |

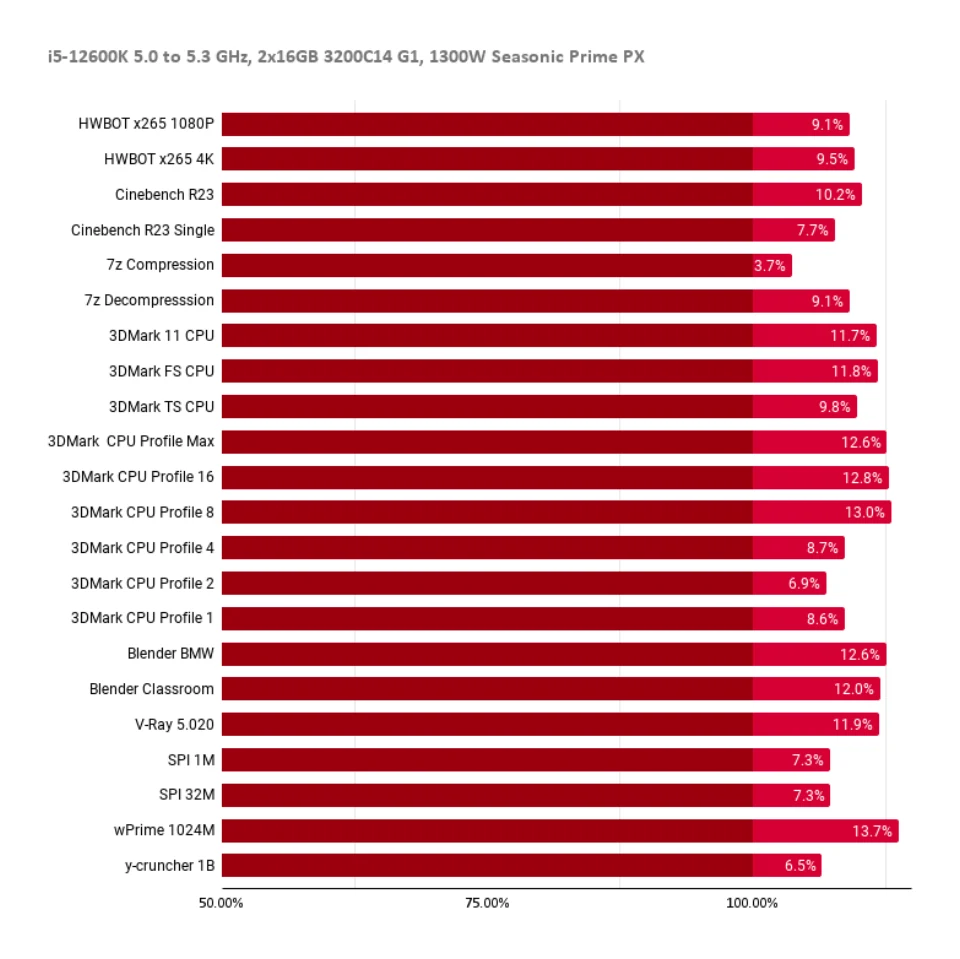

Overall, the overclocked 12600K scored 10.0% better on average compared to stock settings. Peak power consumption increased from 184W to 244W which is stock 12900K level, but this was to be expected due to the increased voltage levels.
5. Summary
At the end, I want to give you a short summary of the most important takeaways when it comes to overclocking an Alder Lake processor.
- There are two types of cores, powerful P-Cores and weaker E-Cores.
- The P-Cores can clock higher and reach frequencies above 5.0 GHz, while the E-Cores max out at about 4.0 GHz.
- The Ring Clock will max out at about 4.3 to 4.4 GHz when the E-Cores are enabled.
- VccIA is the only voltage driving the P-Cores, the E-Cores and the Ring
- The voltage-frequency curve defines the voltage used at a certain ratio.
- The specified CPU core voltage will be used for the highest defined core ratio.
- Voltages for ratios not defined in the v/f curve will be calculated and follow a pretty much linear pattern between two neighboring points on the curve.
- Using adaptive + offset, or advanced offset mode allows for more granular control over the v/f curve.
- Overclocking the turbo ratios is recommended over a static all-core overclock when using ambient cooling.
Final words
Overclocking the i5-12600K can be a lot of fun, but you have to be aware of the characteristics the new Alder Lake architecture brings with it, especially the behavior of the voltage-frequency curve. Getting a basic overclock running is actually quite easy as the v/f curve does scale up to a certain frequency level.


Comments (0)
No comments so far.