- Introduction
- Teardown & Overview
- The new Intel Graphics Software
- Baseline Performance
- Overclocking the Intel Arc B580
- Beyond the Power Limit
- Final words
1. Introduction
The new Intel Arc B580, the first GPU featuring the new "Battlemage" architecture, just launched in December 2024 and with its larger 12GB frame buffer and competitive pricing, the card was well received by reviewers for its overall great value and generational improvements over the previous "Alchemist" lineup. Alongside the new GPUs, Intel also introduced a new software called Intel Graphics Software, which is a replacement for the existing Arc Control software with a refreshed user interface and new features.
Additionally to Intels own B580 Limited Edition card, there are many different third party B580 models from vendors like ASRock, Sparkle and Acer, just to name a few. These cards come in different sizes and cooling solutions as well as a slightly higher clock speed from the factory. My model of choice will be the ASRock B580 Steel Legend OC, because of its 3-Fan cooler design and dual 8-Pin PCIe power connectors, which should be beneficial for overclocking.
In this guide I will test out the overclocking experience of the new generation of Intel Arc graphics cards and what OC features the newly released Intel Graphics Software has to offer.
2. Teardown & Overview

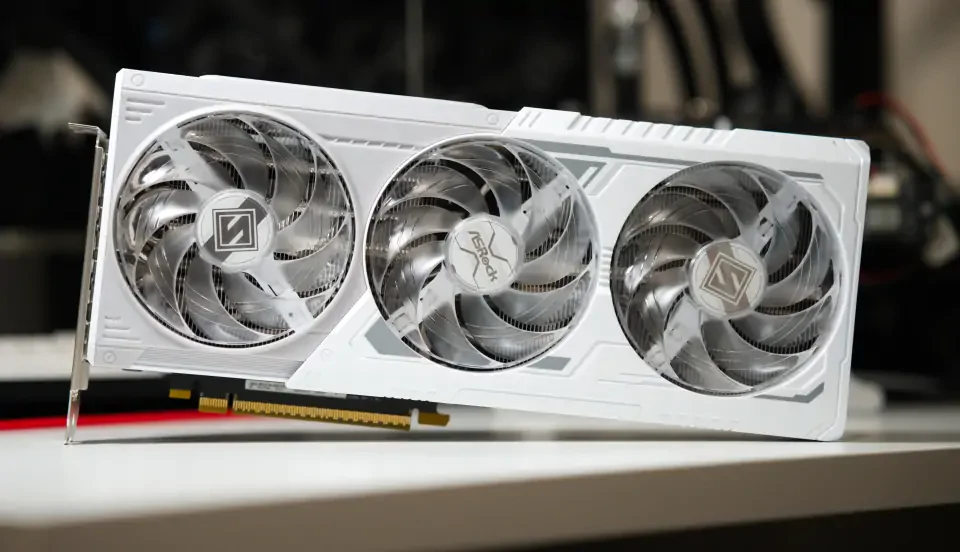


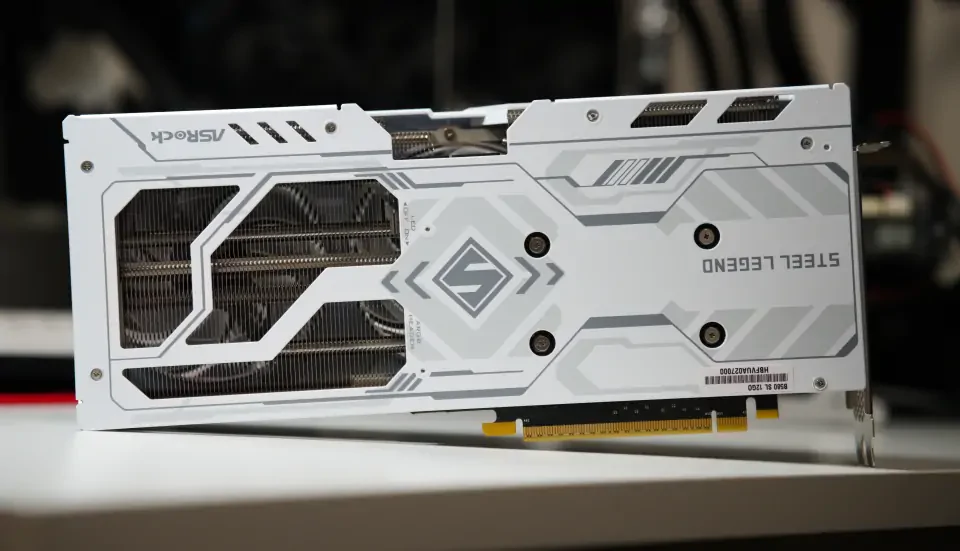


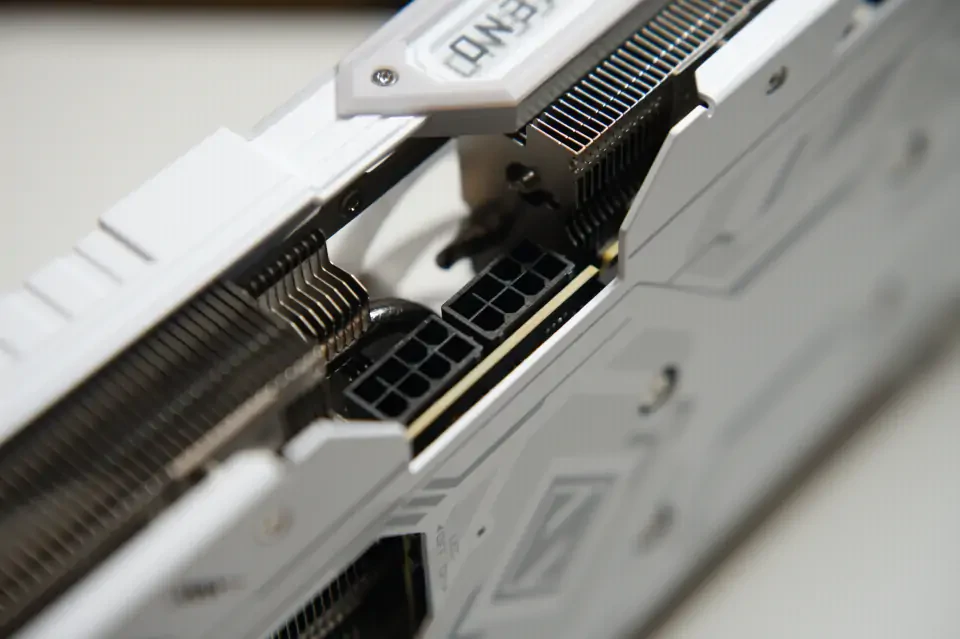


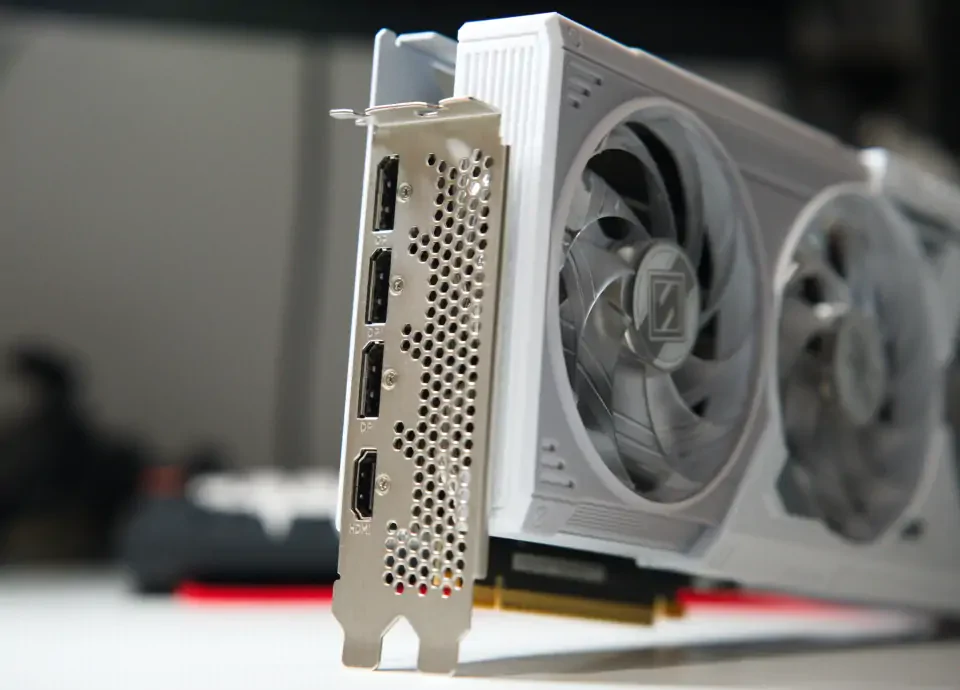

The ASRock B580 Steel Legend OC needs a minimum of 2.5 slots and offers three DisplayPort and one HDMI port output options.

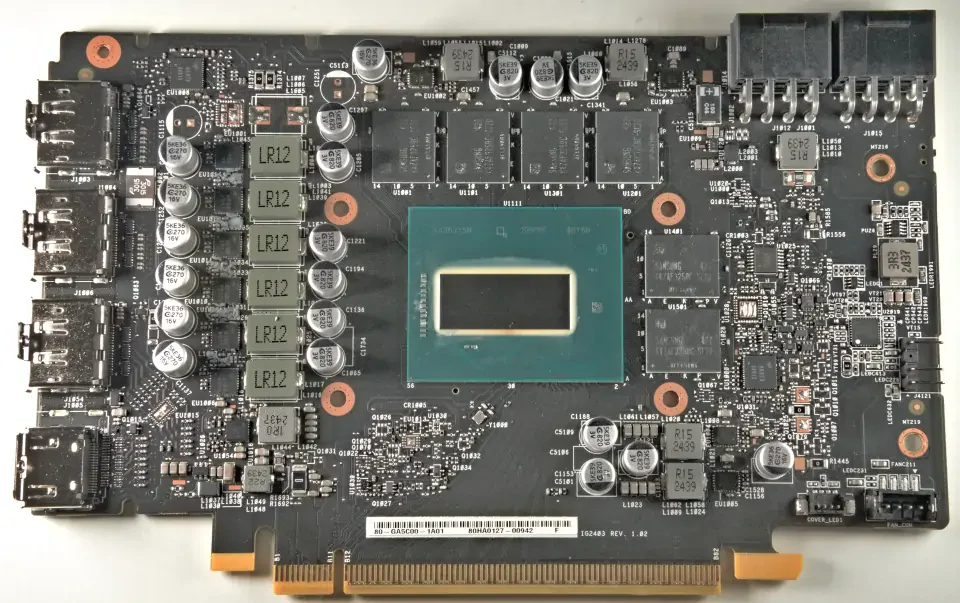


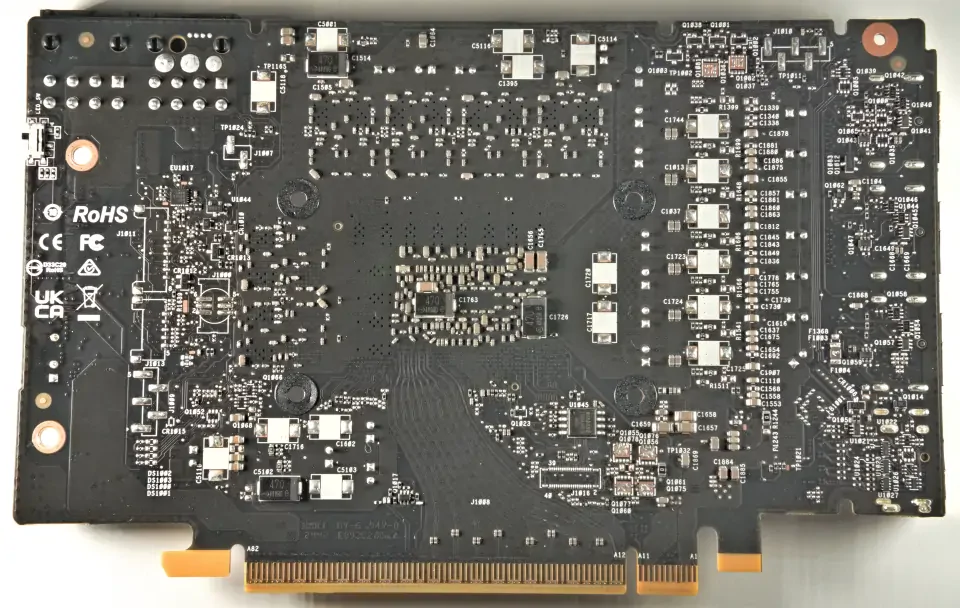

The front- and backside of the PCB look almost identical to the design of the Intel B580 Limited Edition, but the ASRock model has a second 8-Pin power connector that's probably useless anyway given the power limit of the card.

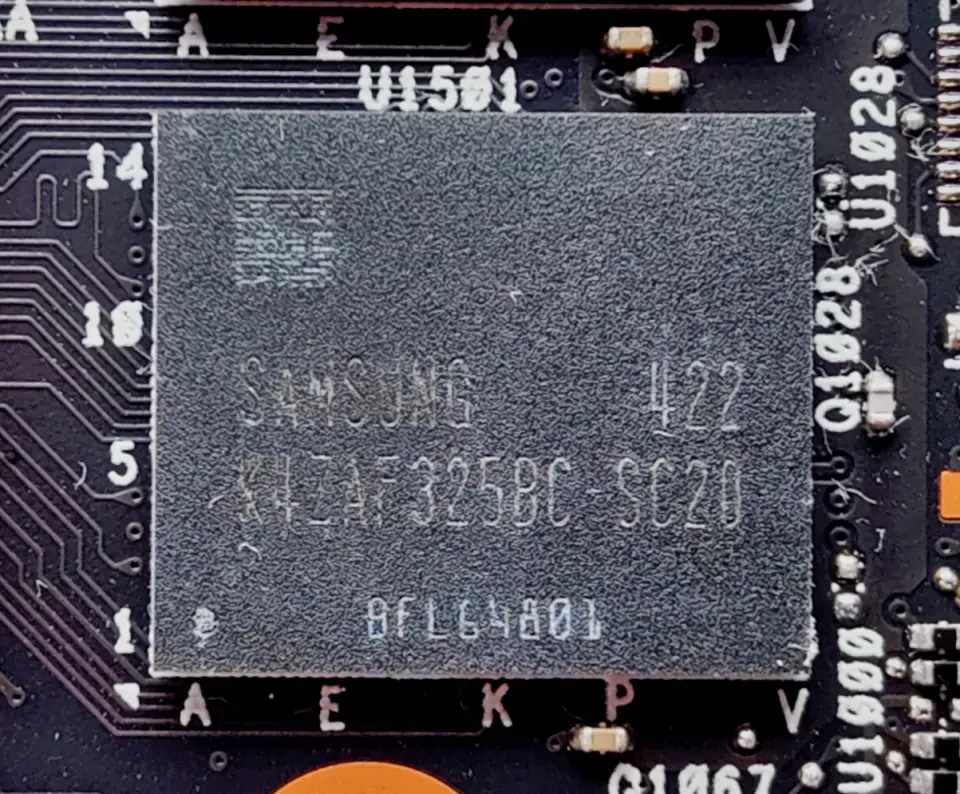

The memory modules on the Intel Arc B580 Steel Legend OC are from Samsung and carry the model number K4ZAF325BC-SC20 with a rated speed of 20 Gbps.

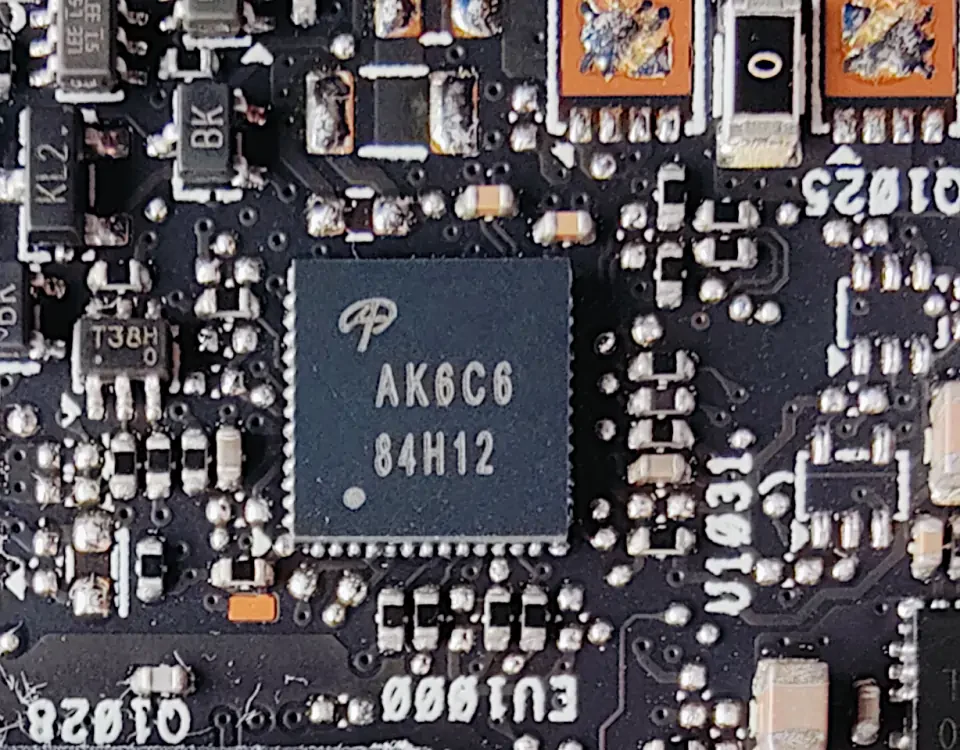

The memory VRM is controlled with an Alpha & Omega AOZ71137QI multiphase controller. For the memory power stages, Alpha & Omega AOZ5507QI DrMOS power stages with the part number code AC00 are used. These are rated for a maximum of 30A continuous current.

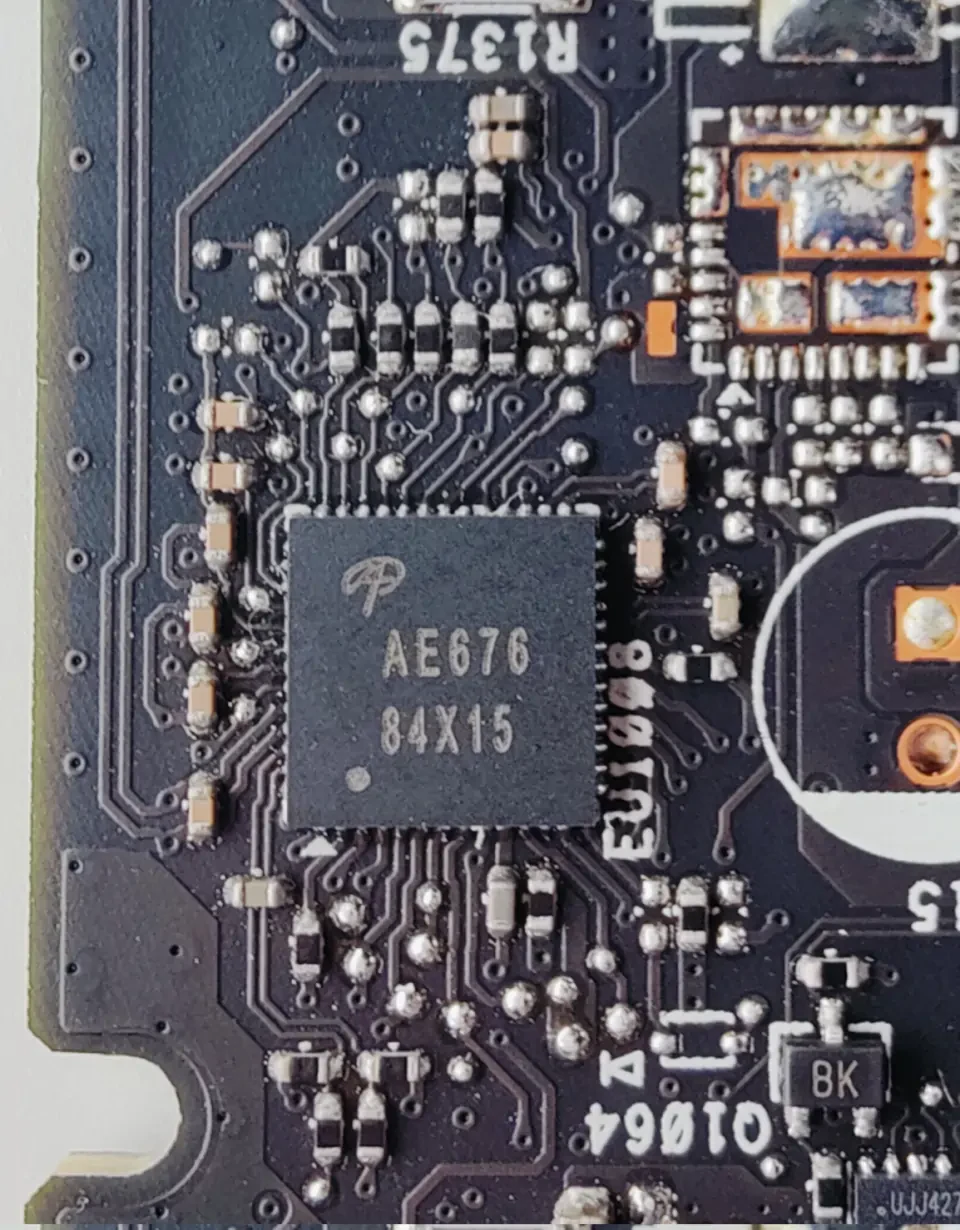

For the VRM of the GPU, another Alpha & Omega Controller is used, but I am not exactly sure what model this is. I suspect it might be another AOZ71137QI because this is the only multiphase controller with 13 pins on each side listed on the Alpha & Omega website.

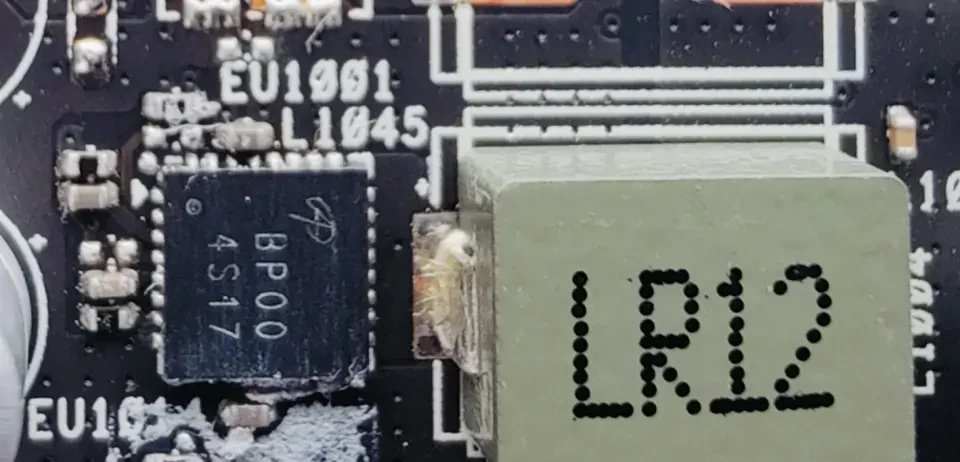

The power stages used for the 6-Phase GPU VRM are AOZ5517QI also from Alpha & Omega. These are rated for up to 60A of continuous output current.
3. The new Intel Graphics Software
The Intel Graphics Software completely replaces the previously known Intel Arc Control and is a new tool with a redesigned user interface as well as more and (hopefully) improved features for the new GPU generation.
What I really liked about the old Arc Control software was the ability to provide a GPU voltage offset because this greatly improves the overclocking potential of the card (while increasing power draw and stress on the cards components of course). However, the tool lacked standard features like memory overclocking and even fan control was completely missing in the first versions of the software. Additionally, the "GPU Performance Boost" slider, which basically offsets the GPU clock speed by some amount, was just an arbitrary scale from 0 to 100 which made it unnecessarily harder to understand the influence of it on the cards behavior.

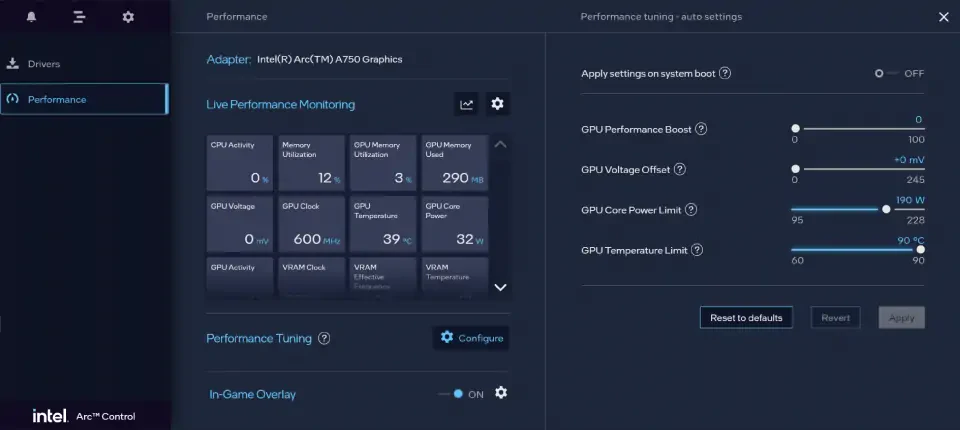

Now, the new Intel Graphics Software already comes with all the performance tuning features which were also available in Arc Control, which is good and also what I would expect.

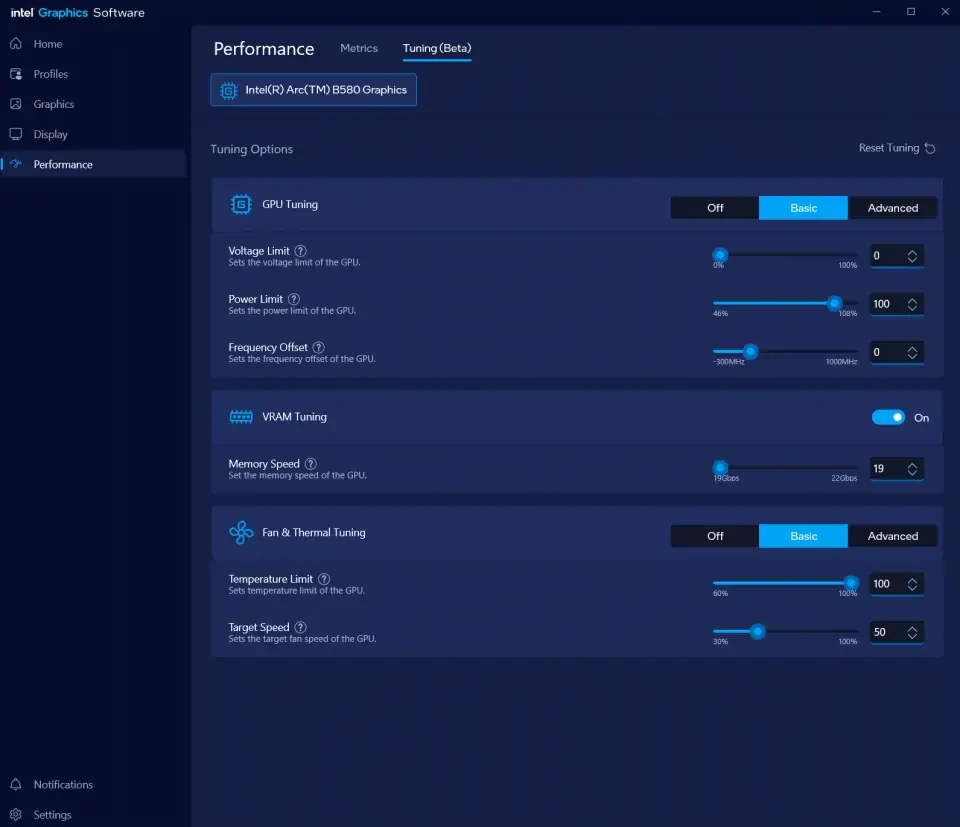

The new "Performance" UI looks more mature and is better organized by separating the monitoring and tuning functionality in different tabs. From looking at the tab name however, you can see that it says "Tuning (Beta)", which suggests that some functions might be either missing or not be fully stable yet due to the "Beta" status. The different tuning options are now grouped in separate sections and can be switched on or off independently.
Let's have a short overview of the provided tuning functions:
- Voltage Limit (previously "GPU Voltage Offset")
The main difference between the voltage limit slider and the Arc Control version of it is that it is now implemented as a percentage slider instead of mV. Other than that, the behavior is exactly the same as it was in Arc Control. I think this was a completely unnecessary change because it just makes it harder to understand how the voltage limit slider works. How would you expect the card to behave if you set the "Voltage Limit" to 25%? To me it sounds like the card now runs at only 25% of some unknown voltage limit, but we will see the actual effect later. It's much clearer to understand a "GPU Voltage Offset" of e.g. 50 mV like in Arc Control in my opinion. - Power Limit (previously "GPU Core Power Limit")
For the power limit slider, again the units changed from absolute numbers in watts to a percentage slider from 46% to 108%. Again, I think this change wasn't needed and I preferred the implementation in Arc Control. - Frequency Offset (previously "GPU Performance Boost")
The frequency offset slider is available when "GPU Tuning" is set to "Basic" mode. It is implemented as an actual frequency slider from -300 MHz to +1000 MHz instead of the 0 to 100 arbitrary value slider present in Arc Control. I really appreciate this change, because in Arc Control it was really just trial and error what clock speed you would get if you change the GPU Performance Boost slider. - Memory Speed (new)
Lets you adjust the effective memory speed in Gbps which makes sense to me. However, it behaves a little bit strange, because when you change the slider, the small input field on the right side doesn't display the decimal point and shows a value like "205" or instead of correctly displaying it as 20.50. This is a small detail however and doesn't change the actual behavior at all. - Temperature Limit (previously "GPU Temperature Limit")
This let's you change the maximum allowed GPU temperature. It's a total mystery to me however why Intel decided to change this from an easy to understand, predictable, absolute unit like °C to a relative one. This is just stupid, honestly. Everyone understands a temperature limit of e.g. 90°C, but what's the actual maximum allowed temperature if you set the limit to 80% or 90%? - Target Speed
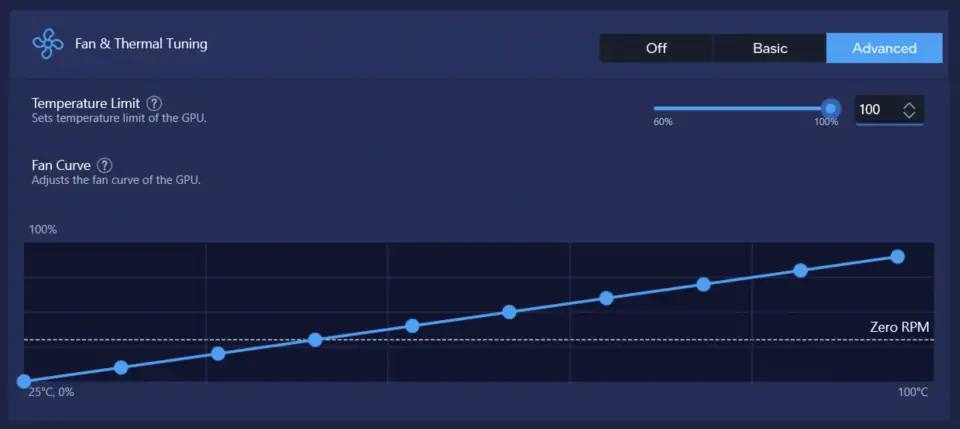
This lets you set the GPU fan speed to a fixed value from 0 to 100%, if you have selected the "Basic" mode. Switching to "Advanced" mode will enable you to define an actual fan curve depending on the GPU temperature.


- Voltage-Frequency Curve (new)
The Voltage-Frequency Curve option is only available when "GPU Tuning" is set to "Advanced". It lets you completely customize the voltage/frequency curve of the card instead of applying a simple offset like in "Basic" mode. This is especially useful because it gives us insights about the cards clocking behavior which should help us choose an appropriate voltage limit during overclocking.

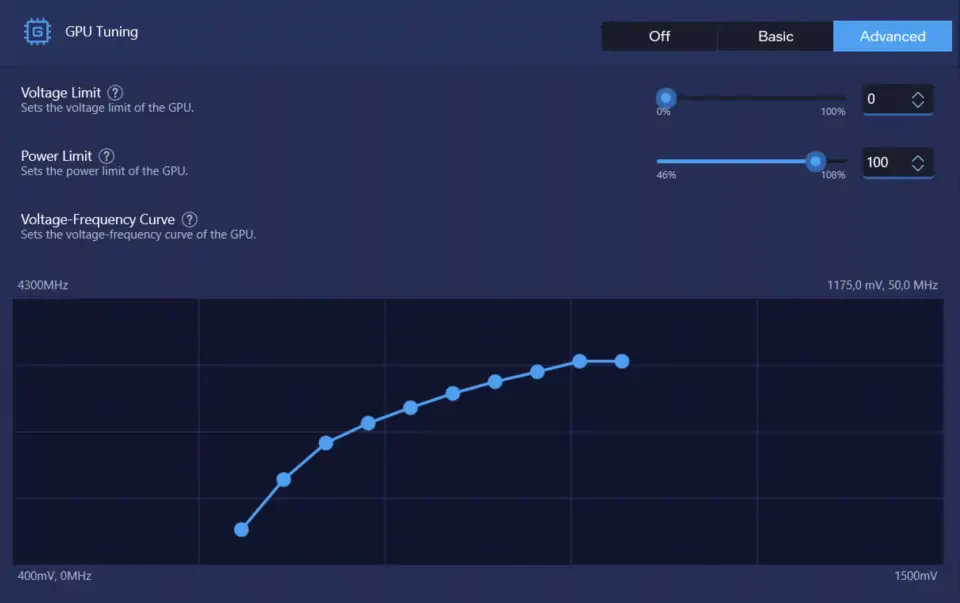

For convenience, I have listed the default points in of the voltage/frequency curve below:
| Voltage | Frequency |
|---|---|
| 670 mV | 570 MHz |
| 720 mV | 1380 MHz |
| 770 mV | 1970 MHz |
| 820 mV | 2290 MHz |
| 870 mV | 2540 MHz |
| 920 mV | 2770 MHz |
| 970 mV | 2960 MHz |
| 1020 mV | 3120 MHz |
| 1070 mV | 3290 MHz |
| 1120 mV | 3290 MHz |
Although the cards spec only states a boost clock of 2800 MHz, the voltage frequency curve has points configured up to 3290 MHz and 1120 mV. It's gonna be interesting how the card actually behaves under load and how far it can be overclocked.
Thoughts
My first impressions of the new Intel Graphics Software are a little bit mixed. I do like that there are more tuning options like VRAM overclocking and the full voltage/frequency curve, but I also think Intels decision to abstract most of the functions and use percentage sliders for most of the features is just making things more complicated than they need to be. In the end however, what matters is how well the software works in practice which we can only find out during overclocking.
4. Baseline Performance
Before doing any overclocking on the card, I'm gonna run a quick benchmark at stock settings to establish a performance baseline and analyze the actual clock speed, power draw and temperatures under load. Let's also have a quick lock at the relevant specs of the B580 Steel Legend OC and the default specs from the Intel B580 Limited Edition model.
| Intel Arc B580 Limited Edition | ASRock B580 Steel Legend OC | |
|---|---|---|
| GPU Clock | 2670 MHz | 2800 MHz |
| Memory Clock | 2375 MHz (19 Gbps) | 2375 MHz (19 Gbps) |
| Power Limit | 190 W | not listed on website |
The ASRock model comes with a +130 MHz GPU clock out of the box compared to the Intel card, which seems like a substantial amount to me actually. Other than that, the memory clock is 19 Gbps (2375 MHz respectively) on both cards, but I couldn't find any info about the power limit on the ASRock website.
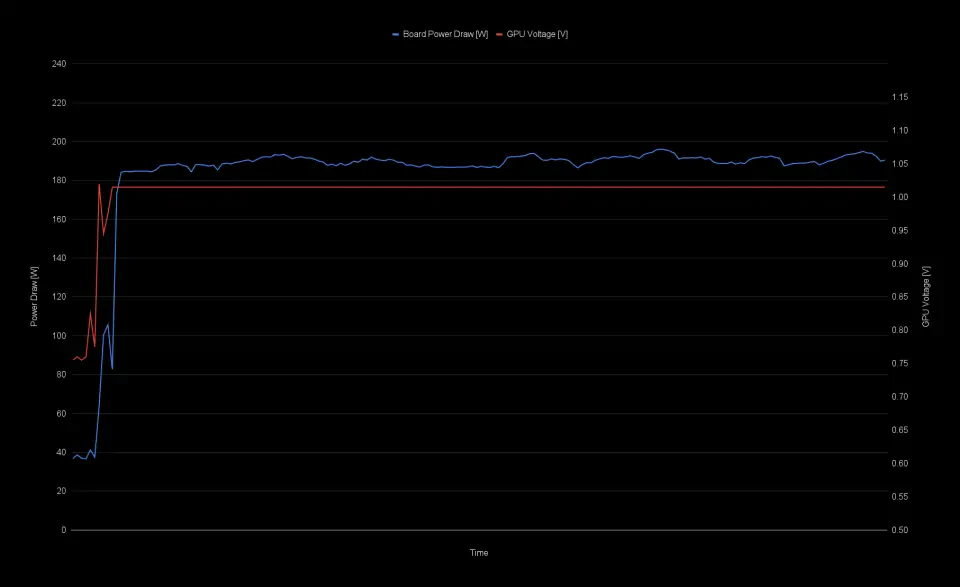
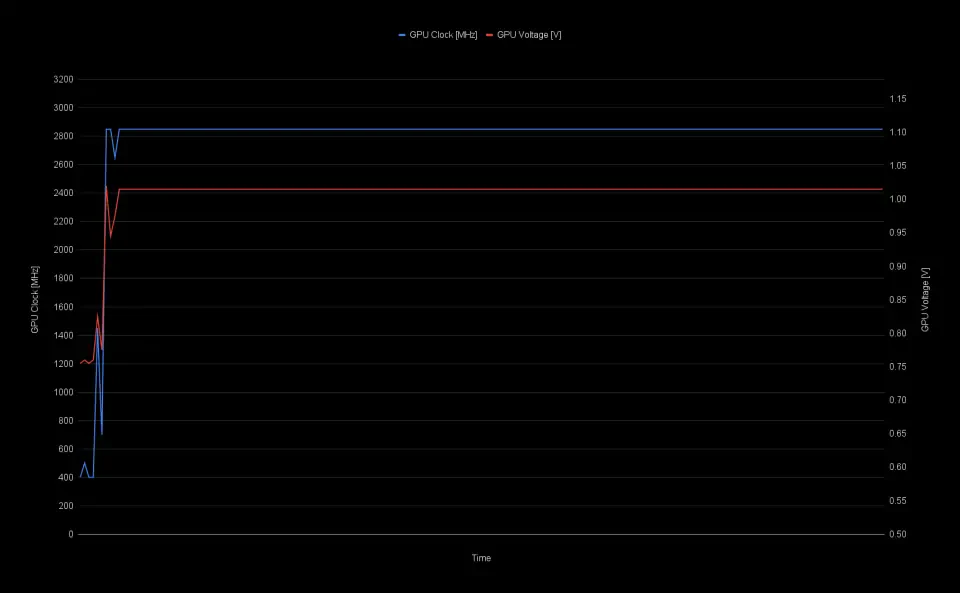
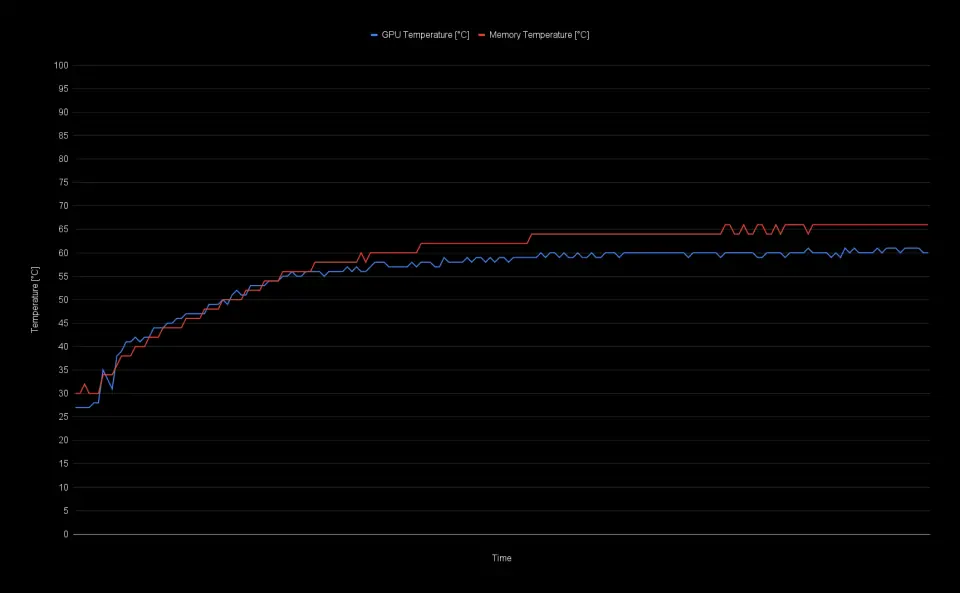
I've run Unigine Superposition 4k Optimized and logged the data with GPU-Z to verify the specs of the card. Surprisingly, the actual clock speed was 50 MHz higher sitting at 2850 MHz throughout the full benchmark run while the memory frequency stayed at the specified 2375 MHz. The total board power was hovering at around 190 W with the GPU core hitting 61°C and the memory 66°C max without any changes to the fan profile. GPU voltage was at a constant 1.015 V and memory voltage at 1.352 V. The B580 was able to achieve a score of 9870 points in its stock configuration. I will use the Unigine Superposition 4K Optimized benchmark throughout the rest of the guide to demonstrate the overclocking process and behavior of the card.
| GPU Clock (avg) | 2850 MHz |
| Memory Clock | 2375 MHz (19 Gbps) |
| GPU Temperature (max) | 61°C |
| Memory Temperature (max) | 66°C |
| Board Power Draw (max) | 196.1 W |
| Board Power Draw (avg) | 189.7 W |
| Fan Speed (max) | 1089 RPM |
| GPU Voltage (max) | 1.015 V |
| Memory Voltage (max) | 1.352 V |
| Superposition 4K Optimized Score | 9870 |
If we take a look at the observed GPU clock and voltage and compare that to the voltage/frequency curve visible in the Intel Graphics Software, we can notice quite a deviation from the defined curve. With 1.015 V GPU voltage, the clock speed should already be over 3000 MHz according to the curve. It's probably expected that the clock speed won't always match with the values from the voltage/frequency curve, because of other influencing factors like power draw and temperature, or maybe the voltage/frequency curve is different under certain load scenarios.






5. Overclocking the Intel Arc B580
With the performance baseline established, we can start overclocking the card with the Intel Graphics Software. First, I'm gonna set a fixed fan speed of 55% to get more thermal headroom for overclocking and also increase the power limit to the maximum allowed value of 108%.
Memory Overclocking
Overclocking the VRAM of the B580 is pretty straight forward and as easy as sliding the memory speed slider to the right in the Intel Graphics Software. The default speed of the card is 19 Gbps (although the memory modules are rated for 20 Gbps by Samsung) and the slider allows for an adjustment up to 22 Gbps.
Usually, what I like to do to find a good starting point and to get a feel for the maximum speed achievable, is to run a benchmark while simultaneously bumping up the memory speed slightly until the card gets unstable or crashes. With the B580 however, things started to behave strange once I started changing the memory speed with the card under load. The system would regularly crash when applying changes in the Intel Graphics Software while having a memory overclock applied. For example, I set a memory speed of 21 Gbps, hit apply and it worked. Then I would change any other setting like increasing the power limit, hit apply and the system would crash. To me it seemed that having a too high memory speed would break the Intel Graphics Software to a point where it would crash randomly when applying any changes. After forcefully shutting down the system and restarting it, I always could recover from the crashes and the Intel Graphics Software would either reset or show a dialog, asking if I want to keep editing the previous settings or reset to default.

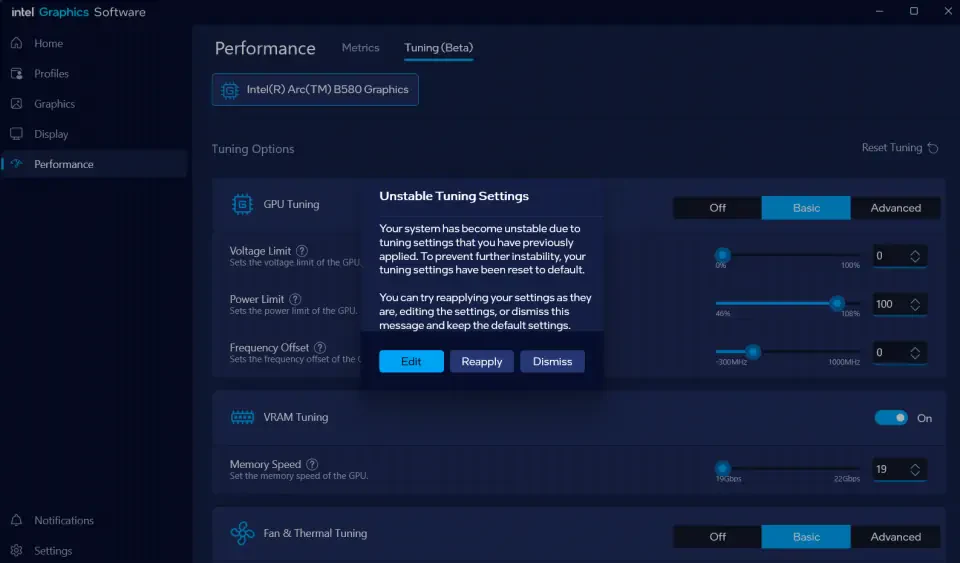

I played a little bit around with different memory speeds and finally settled for just 20 Gbps (translates to 2500 MHz memory clock) because this seemed to work fine without unexpected crashes. I finished another run of Unigine Superposition 4K Optimized with the new settings and here are the first results.
| GPU Clock | 2850 MHz |
| Memory Clock | 2500 MHz (20 Gbps) |
| GPU Temperature (max) | 49°C |
| Memory Temperature (max) | 52°C |
| Board Power Draw (max) | 196.8 W |
| Board Power Draw (avg) | 191.4 W |
| Fan Speed (max) | 2457 RPM |
| GPU Voltage (max) | 1.015 V |
| Memory Voltage (max) | 1.352 V |
| Superposition 4K Optimized Score | 9997 |
The higher memory speed and power limit impacted the score only marginally and resulted in an increase of 1.2% to 9997 points. The power draw basically stayed unchanged compared to the baseline performance which is to be expected as the voltages are also the same. The GPU and memory temperatures are of course significantly lower due to the much higher fan speed.
| Memory Speed | GPU Clock & Offset | Voltage & Voltage Limit | Power Draw (avg) | Superposition 4K Optimized |
|---|---|---|---|---|
| 2375 MHz (19 Gbps) | 2850 MHz (+0) | 1.015 V (0%) | 189.7 W | 9870 |
| 2500 Mhz (20 Gbps) | 2850 MHz (+0) | 1.015 V (0%) | 191.4 W | 9997 |
Voltage Limit and Frequency Offset
We will keep the 20 Gbps memory speed and continue to overclock the GPU core. This can be done by immediately applying a frequency offset, or by changing the voltage limit. At this point, it's important to remember how the voltage limit works on Intel Arc GPUs. The card tries to follow a voltage/frequency curve, which means for a given voltage it will try to run a specific clock speed. Changing the voltage limit to a higher value will tell the card to run at a higher voltage level and as a result also a higher frequency. Take our values during the baseline performance run as an example. We have a GPU clock of 2850 MHz at 1.015V. If we increase the voltage limit and the card now runs at lets say 1.05V, it will not use the same clock speed of 2850 MHz, but rather the speed that's defined for that given 1.05V. This can be very confusing for first time users because most users wouldn't expect the frequency to change when a voltage limit is adjusted.
Increasing the Voltage Limit
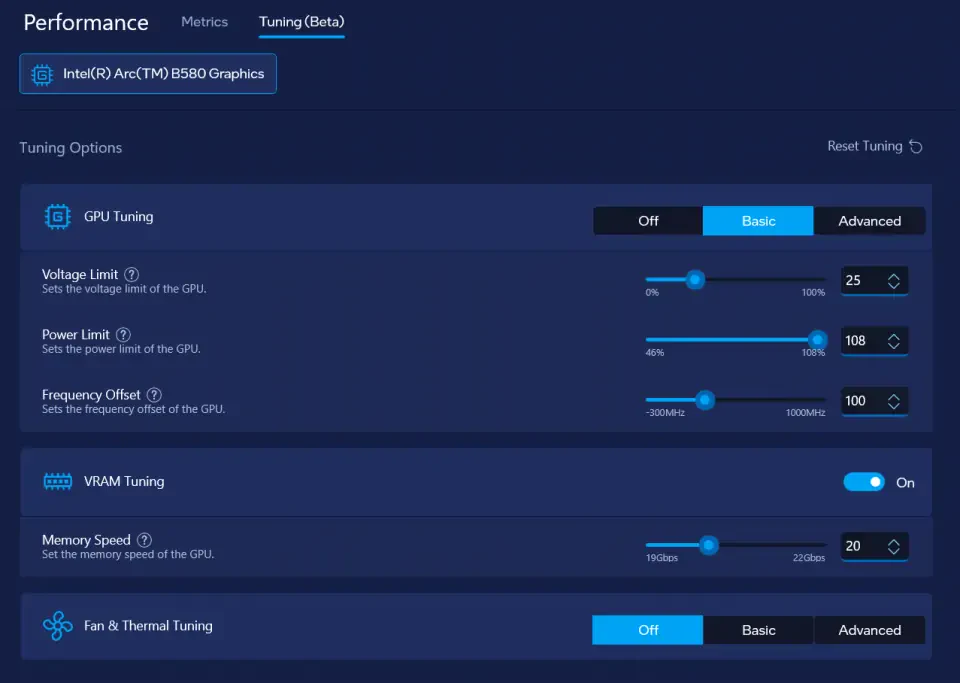
I think you can get the best results by first starting to increase the voltage limit as it will increase the voltage and GPU clock speed at the same time and therefore not impact stability too much as long as there is some power limit left. I will set the voltage limit to 25% initially and then gradually bump it up by 10% until the power limit kicks in.
| Memory Speed | GPU Clock (avg) & Offset | Voltage (max) & Voltage Limit | Power Draw (avg) | Superposition 4K Optimized |
|---|---|---|---|---|
| 2375 MHz (19 Gbps) | 2850 MHz (+0) | 1.015 V (0%) | 189.7 W | 9870 |
| 2500 Mhz (20 Gbps) | 2850 MHz (+0) | 1.015 V (0%) | 191.4 W | 9997 |
| 2500 Mhz (20 Gbps) | 3000 MHz (+0) | 1.045 V (25%) | 209.3 W | 10360 |
| 2500 Mhz (20 Gbps) | 3050 MHz (+0) | 1.060 V (35%) | 216.4 W | 10475 |
| 2500 Mhz (20 Gbps) | 3081 MHz (+0) | 1.080 V (45%) | 225.1 W | 10520 |
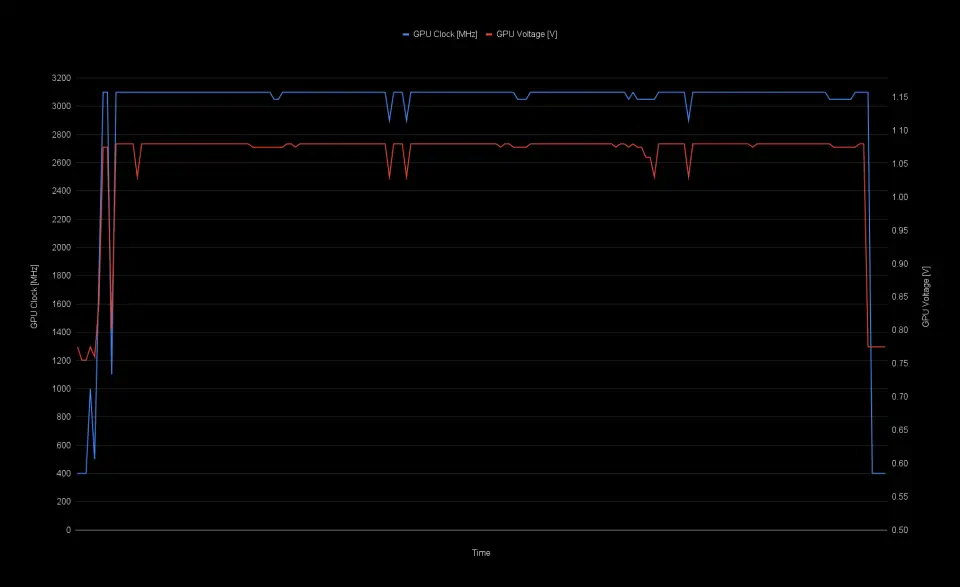
With a voltage limit of 25% and 35%, the card completed the full benchmark run without clocking down and was able to hold the respective voltage level. At 45% voltage limit, the GPU clock and voltage dipped occasionally due to the power limit interfering.

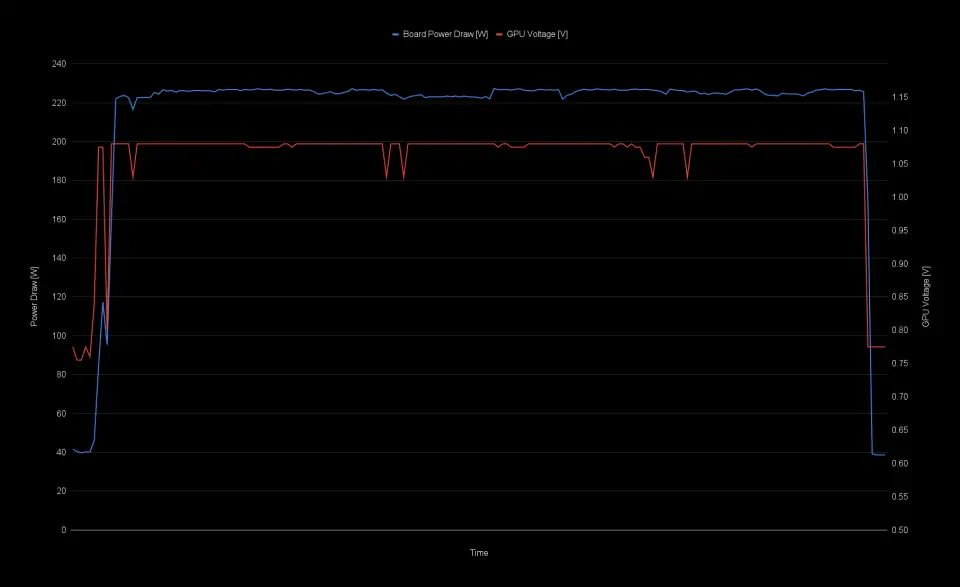

Looking at the power limit chart, we can see that the board power draw is still fluctuating, which is an indicator that the card operates below its maximum power limit at least at some portions of the benchmark.



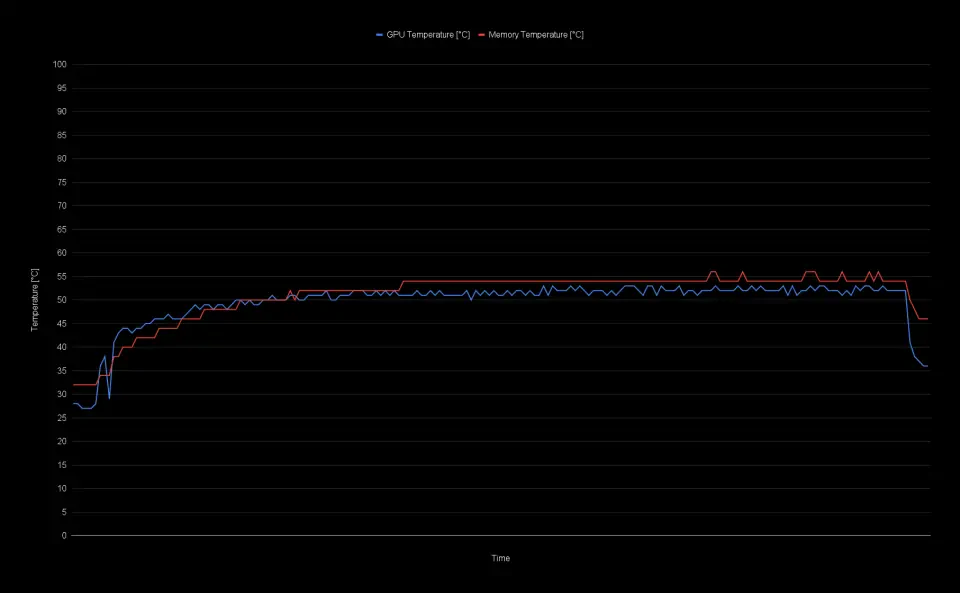

Increasing the Frequency Offset
I figured that pushing the voltage limit any further wouldn't make much sense at this point, so I continued to add a frequency offset. I started with an offset of +50 MHz and then added another +50 MHz after every benchmark run. After successfully finishing the benchmark with a +200 MHz offset, I noticed that the score was lower compared to the result with +150 MHz offset, so I stopped.
| Memory Speed | GPU Clock (avg) & Offset | Voltage (max) & Voltage Limit | Power Draw (avg) | Superposition 4K Optimized |
|---|---|---|---|---|
| 2375 MHz (19 Gbps) | 2850 MHz (+0) | 1.015 V (0%) | 189.7 W | 9870 |
| 2500 Mhz (20 Gbps) | 2850 MHz (+0) | 1.015 V (0%) | 191.4 W | 9997 |
| 2500 Mhz (20 Gbps) | 3000 MHz (+0) | 1.045 V (25%) | 209.3 W | 10360 |
| 2500 Mhz (20 Gbps) | 3050 MHz (+0) | 1.060 V (35%) | 216.4 W | 10475 |
| 2500 Mhz (20 Gbps) | 3081 MHz (+0) | 1.080 V (45%) | 225.1 W | 10520 |
| 2500 Mhz (20 Gbps) | 3120 MHz (+50 MHz) | 1.080 V (45%) | 226.2 W | 10583 |
| 2500 Mhz (20 Gbps) | 3148 MHz (+100 MHz) | 1.080 V (45%) | 226.6 W | 10651 |
| 2500 Mhz (20 Gbps) | 3194 MHz (+150 MHz) | 1.080 V (45%) | 227.0 W | 10721 |

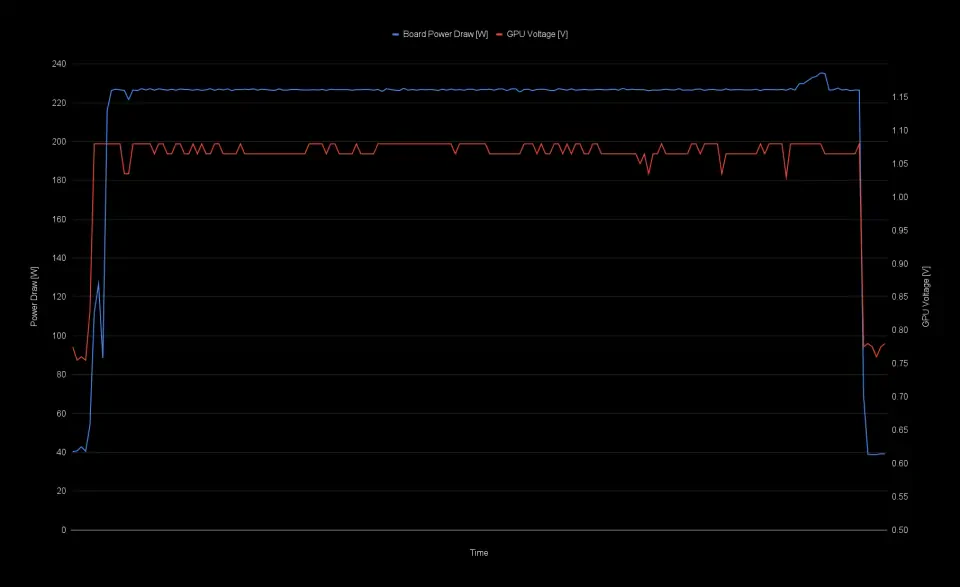


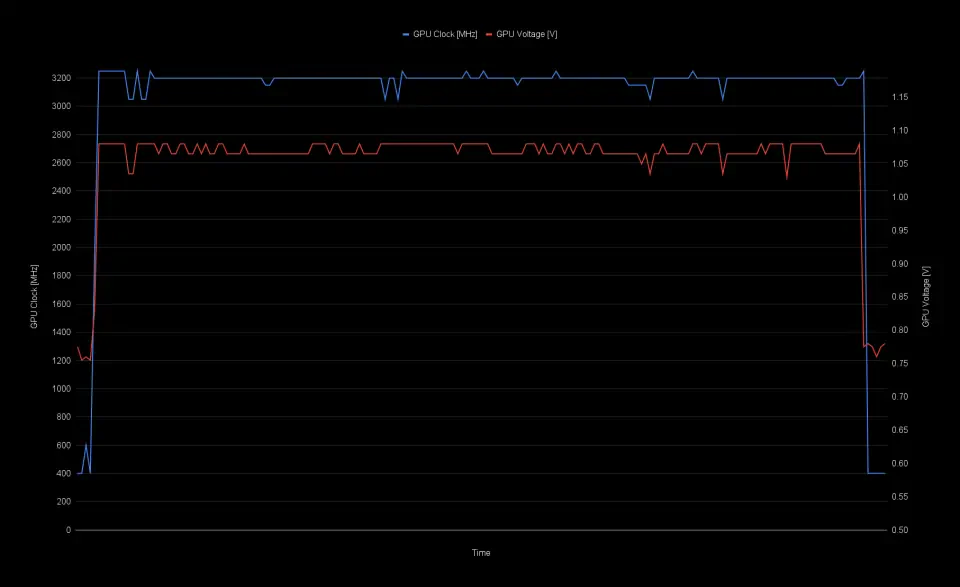


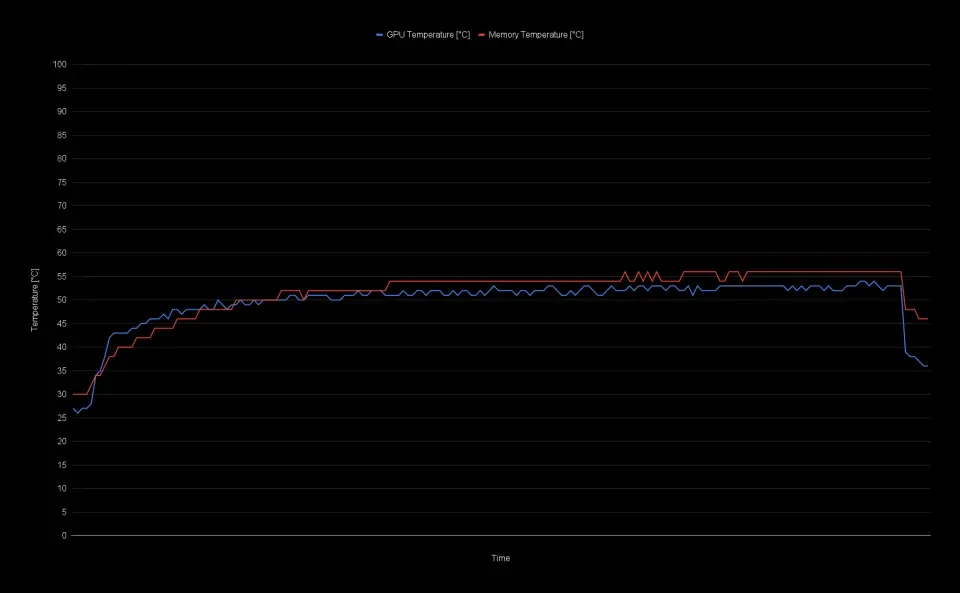

Looking at the board power draw chart, the line is now completely straight at about 227 watts which tells us that the card is fully power limited. The voltage also does dip a lot during the benchmark run and so does the GPU clock. In order to get more out of the card, we need to free up some power headroom again by reducing the voltage limit to 35%. This will also drop the frequency, so we will mitigate that drop by increasing the frequency offset further. Interestingly, just dropping the voltage limit back to 35% and keeping the same +150 MHz frequency offset yields pretty much the same benchmark score, because the card is so power limited. At a +200 MHz offset I achieved the highest result. Anything higher wouldn't pass the full benchmark run.
| Memory Speed | GPU Clock (avg) & Offset | Voltage (max) & Voltage Limit | Power Draw (avg) | Superposition 4K Optimized |
|---|---|---|---|---|
| 2375 MHz (19 Gbps) | 2850 MHz (+0) | 1.015 V (0%) | 189.7 W | 9870 |
| 2500 Mhz (20 Gbps) | 2850 MHz (+0) | 1.015 V (0%) | 191.4 W | 9997 |
| 2500 Mhz (20 Gbps) | 3000 MHz (+0) | 1.045 V (25%) | 209.3 W | 10360 |
| 2500 Mhz (20 Gbps) | 3050 MHz (+0) | 1.060 V (35%) | 216.4 W | 10475 |
| 2500 Mhz (20 Gbps) | 3081 MHz (+0) | 1.080 V (45%) | 225.1 W | 10520 |
| 2500 Mhz (20 Gbps) | 3120 MHz (+50 MHz) | 1.080 V (45%) | 226.2 W | 10583 |
| 2500 Mhz (20 Gbps) | 3148 MHz (+100 MHz) | 1.080 V (45%) | 226.6 W | 10651 |
| 2500 Mhz (20 Gbps) | 3194 MHz (+150 MHz) | 1.080 V (45%) | 227.0 W | 10721 |
| 2500 Mhz (20 Gbps) | 3191 MHz (+150 MHz) | 1.065 V (35%) | 224.0 W | 10726 |
| 2500 Mhz (20 Gbps) | 3241 MHz (+200 MHz) | 1.065 V (35%) | 225.7 W | 10857 |

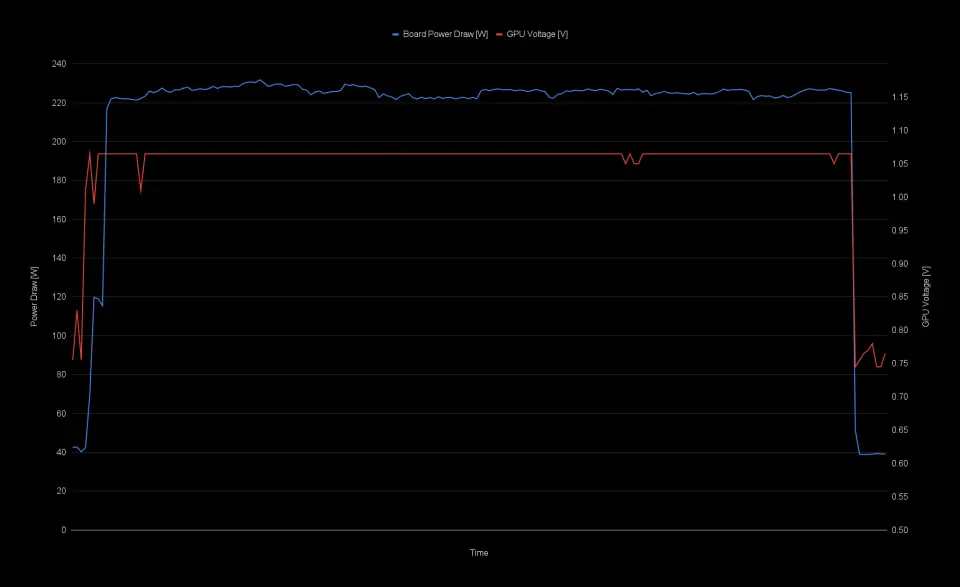


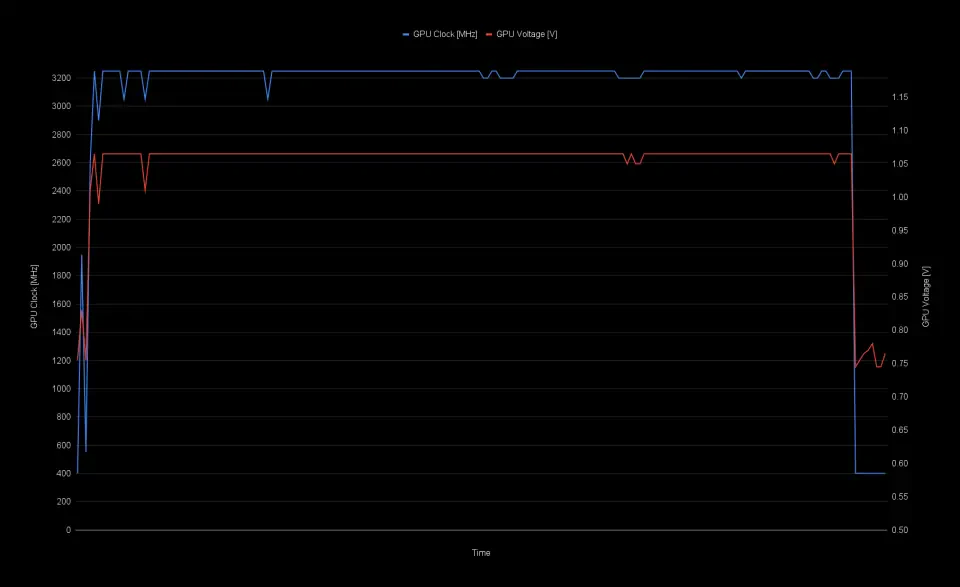


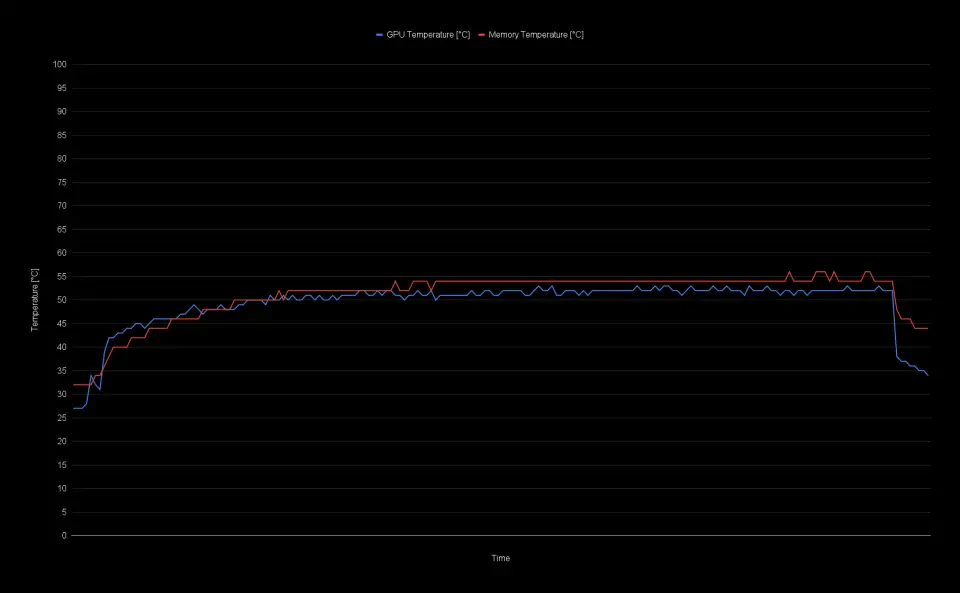

The final score of 10857 represents an improvement of 10% over the stock result of 9870 points. This is of course with everything maxed out as much as possible and certainly, these overclock settings wouldn't hold up against a more thorough stress test.
For a more conservative setting that would be more suitable for daily usage I suggest going a little bit easier on the voltage limit at e.g. 25% with a smaller frequency offset of lets say +100 MHz. This setting would still get you a performance uplift of about 7% with a result of 10556 and a peak core clock of 3100 MHz. I also did a 3DMark Steel Nomad stress test with this configuration and the card passed that test.


Voltage-Frequency Curve
I also wanted to give the new voltage/frequency curve feature a try by switching the GPU Tuning mode to "Advanced" in the Intel Graphics Software. To my disappointment however, this feature seems completely broken to me. If you try to edit the values by clicking on one of the points or also by dragging the point with the mouse, the curve might just reset after hitting apply. It could also happen that the curve just jumps randomly to the right, resulting in a completely different curve than actually configured. It got boring pretty fast and I stopped after a few minutes as it was a waste of time.
During overclocking, I also noticed a strange behavior of the software, where it would sometimes show a voltage/frequency curve that is offset by about either +28 mV or +78 mV compared to the default curve when you switch from "Off" or "Basic" mode to "Advanced" in the GPU Tuning section while the card is under load. We probably have to wait for a newer version of the Intel Graphics Software that addresses those issues.
6. Beyond the Power Limit
To push the card above its limits, the power limit has to be increased beyond the 226 watts. There are multiple ways to achieve this like modifying the actual PCB of the card with a shunt mod, or if you are skilled enough, by reprogramming either the power monitoring IC or the VRM controller with an EVC2 from ElmorLabs.
Power Monitoring
The Intel Arc B580 Steel Legend OC uses an Onsemi NCP45496 power monitoring IC. This IC is programmed to use a 2 mOhm shunt resistor for monitoring the power draw on the 12 V input rail. Basically, the IC measures the voltage drop across that resistor and uses that information together with the fixed 2 mOhm value of the shunt resistor to calculate the power output. If we can lower the shunt resistor value on the PCB however, this calculation will output a lower value, effectively raising the power limit of the card. In theory, you could also use the SVID bus on the controller to reprogram the power calculation, but that exceeds what I am capable of doing. You can read through the datasheet of the NCP45496 if you want to learn more about how the power monitoring works in detail.

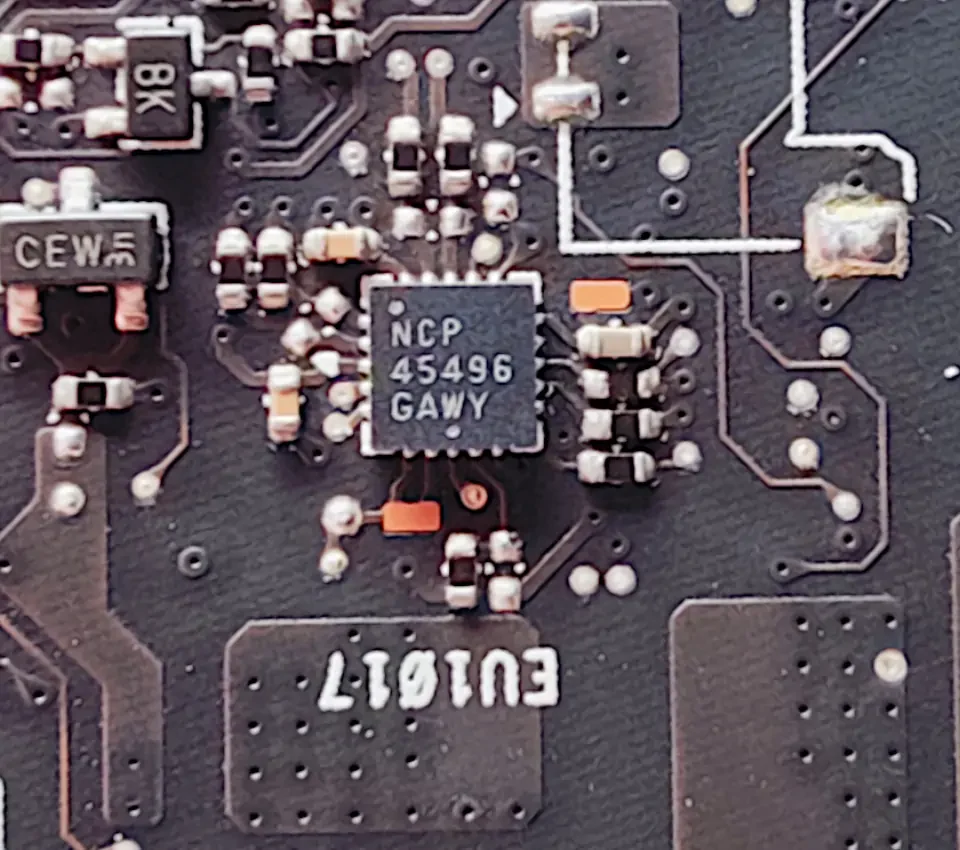

Shunt Resistor Mod
In order to effectively raise the power limit, we have to lower the shunt resistor value. We can either replace the 2 mOhm resistor with a lower value one like 1.5 mOhm or 1 mOhm, or put another resistor in parallel, which will also lower the resistance. You could also simply short the resistor with a small wire if you don't have a shunt resistor at hand, as this basically acts the same way as a parallel resistor. The drawback of just using a wire is, that you don't know the exact resistance the wire is gonna have and therefore won't exactly know where the new power limit will end up. On my card, I quickly soldered on a relatively short wire over the 2 mOhm shunt resistor which is located right after the input filter inductor below the 2x8-Pin power connectors. If anything goes wrong, at least I would be able to remove that wire easily again.

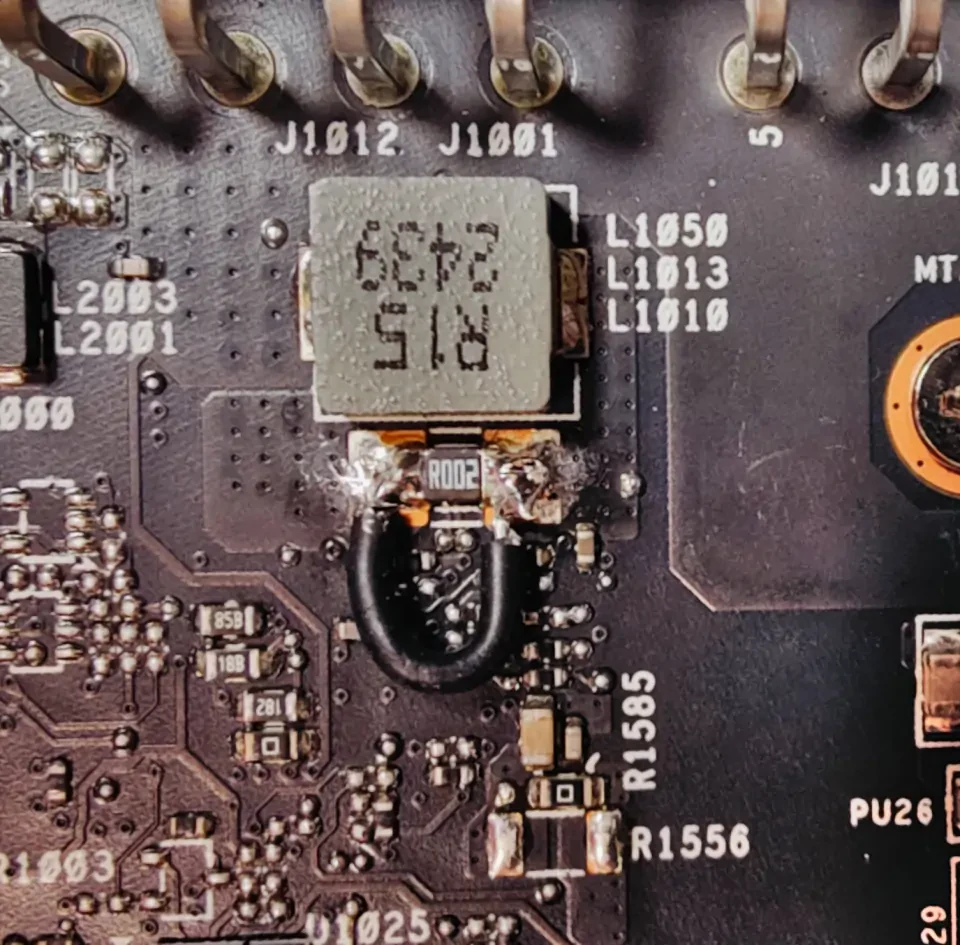

I fired up my system again, this time with the modded card and it booted without any issues. I configured the same overclock settings where I hit the power limit previously with a voltage limit of 45% and a frequency offset of +150 MHz. This time however, GPU-Z reported an average power draw of just 170 W which is about 25% lower than the 226 W limit, confirming that the mod works as expected.
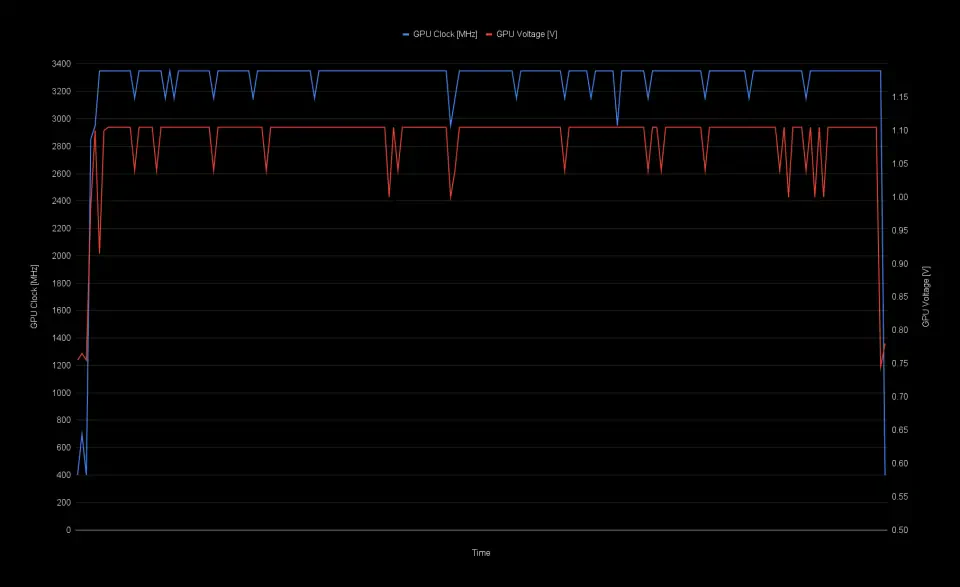
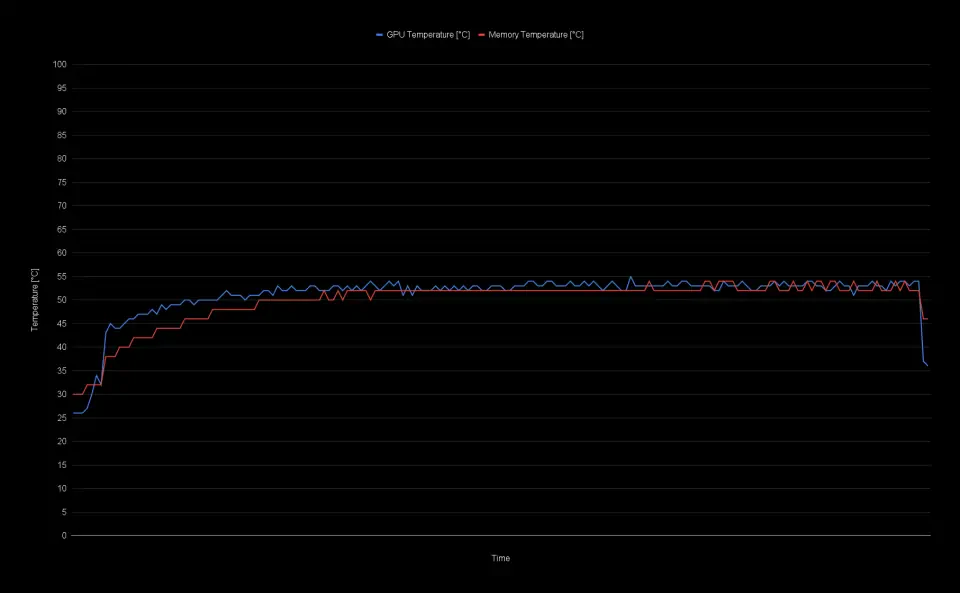
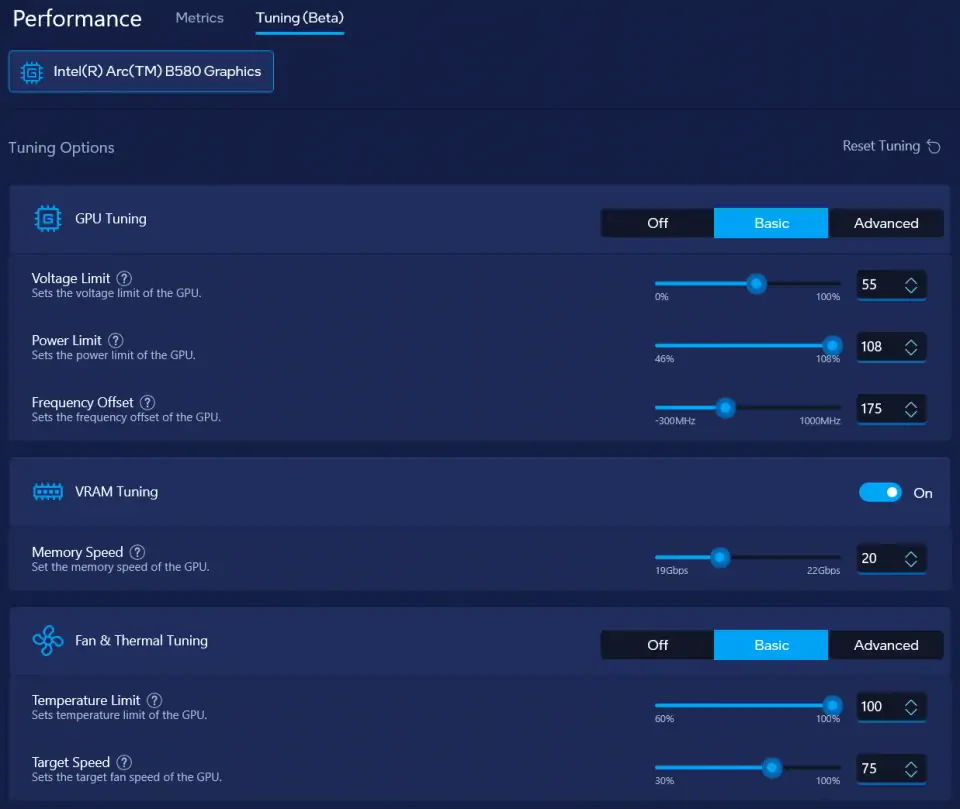
With the voltage limit set to 55% and a frequency offset of +175 MHz the card now scored 11010 points representing an 11.5% increase compared to the baseline performance. In this run, the GPU was clocking at 3329 MHz on average with the GPU voltage hitting up to 1.105 V. The GPU and memory temperature stayed fairly low due to the high fan speed, which I also increased to 75% now, reaching only 55°C on the GPU and 54°C on the memory.
| GPU Clock (avg) | 3329 MHz |
| Memory Clock | 2500 MHz (20 Gbps) |
| GPU Temperature (max) | 55°C |
| Memory Temperature (max) | 54°C |
| Fan Speed (max) | 3055 RPM (75%) |
| GPU Voltage (max) | 1.105 V |
| Memory Voltage (max) | 1.352 V |
| Superposition 4K Optimized Score | 11010 |






7. Final words
Overall, I am very happy with the performance of the card and how far you can push the GPU clock. Intel did try to improve the overall experience with the new Intel Graphics Software as well as adding new features like memory overclocking and more granular fan control. However, the tuning part of the software certainly needs more work. Tuning the memory speed can crash the whole application and the voltage/frequency curve was completely unusable to me. I will wait for future updates of the Intel Graphics Software until the tuning option is not marked as "Beta" anymore and then see if the current issues are solved.
If you have an Intel Arc B580 of any model yourself, I would be happy to hear how the overclocking experience was with your card. Just leave me a comment with your thoughts and feedback below.


Comments (5)