- Introduction
- Baseline Performance
- Overclocking the Intel Arc A750 Limited Edition
- Tear-Down and PCB Overview
- Increasing the power limit
- Improving the GPU Temperature
- Final words
1. Introduction
With the launch of Intels Arc 7 Graphics GPU series in October 2022, we finally have a third contender in the highly competetive discrete GPU market. We know from many reviews already that the Arc A770 and A750 can both deliver competetive performace levels in some cases, but still struggles to cope well with games using older DirectX versions.
I got my hands on an Intel Arc A750 Limited Edition GPU, not to look at it's pure performance aspect but to answer the question: How well does the new "Alchemist" GPU get along with overclocking?
2. Baseline Performance
As always when exploring a new card, I run a few benchmark tests at stock settings to establish a performance baseline and get a feel for the cards frequency and voltage behavior. I decided to use 3DMark Time Spy as well as Unigine Heaven as my tools of choice for this matter.
According to Intel, the Arc A750 has a specified "Graphics Clock" of 2050 MHz which represents the average clock an end user may see during typical gaming workloads for their worst cards. The GDDR6 memory runs at a fixed 2000 MHz and cannot be changed manually, sadly. The power limit is set to 190 watts out of the box with a maximum temperature of 90 °C.
I usually use an Elmor PMD hooked up to an EVC2SX for data monitoring and logging, but as I don't have a way of getting a PCIe power reading, I have to rely on software readings to get the total GPU core power this time.
| 3DMark Time Spy GT1, GT2 | Unigine Heaven | |
|---|---|---|
| Benchmark score | 12259 | 2740 |
| Max. core clock | 2400 MHz | 2400 MHz |
| Avg. core clock | 2388 MHz | 2397 MHz |
| Avg. power draw | 186 W | 157 W |
| Max. power draw | 193 W | 169 W |

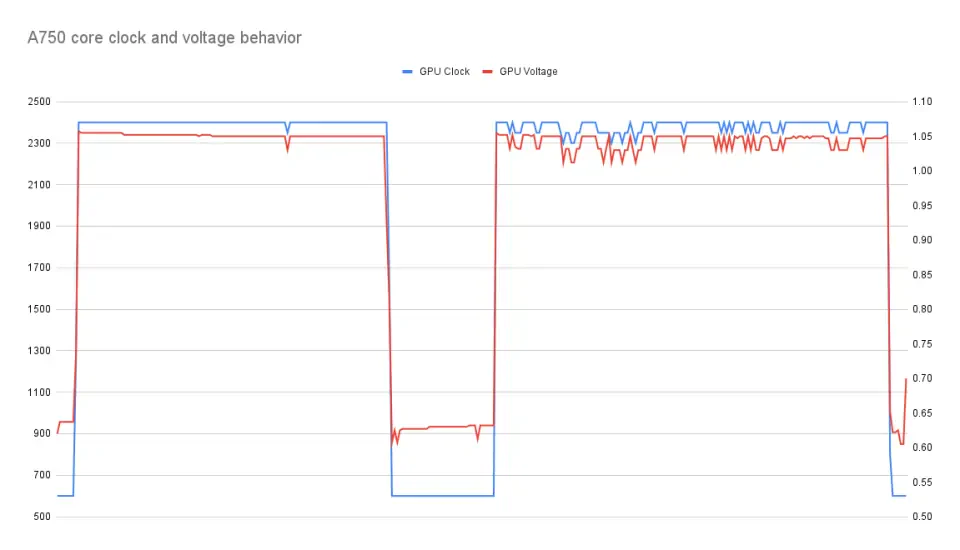

Looking at the results above we can observe clearly that the card runs way above the specified 2050 MHz with an average core clock of 2337 MHz. It also shows that 2400 MHz is the maximum possible core clock at stock settings, even with an average power draw of only 157 watts in the Unigine Heaven run.

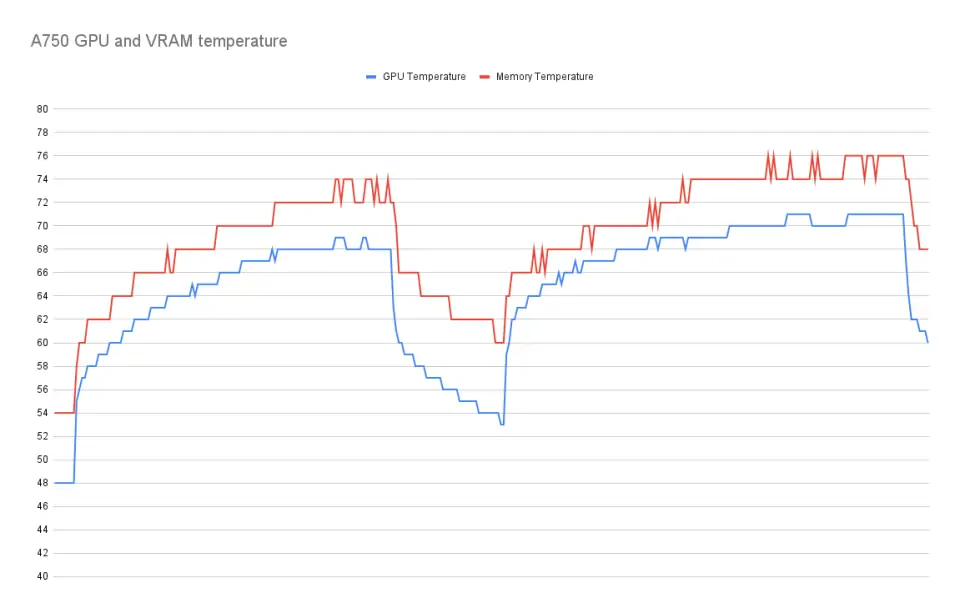

76C at stock settings is not exactly a great place to start, especially because as of writing, it's currently not possible to control the fan speed of the Intel Arc A750 Limited Edition at all. This is a little bit disappointing since temperature is an important factor when it comes to overclocking in general.
3. Overclocking the Intel Arc A750 Limited Edition
First of all, it's really nice see that Intel has provided dedicated overclocking functionality within it's Arc Control Software. However, it's lacking some crucial features like controlling the fan speed and the previously mentioned missing memory overclocking function.
I was really surprised that such a basic feature like controlling the fan speed isn't available since launch, even more so because you can find a screenshot of the Arc Control Software showing a "Fan Speed Control" option while explicitly mentioning the use of the A750 Limited Edition in Intels own Graphics Overclocking 101 article. I asked Intel when the fan speed control feature would be available, but they didn't name any specific time and instead said to keep an eye on the driver release notes.
Despite the lack of basic functionality, Arc Control allows the user to change several other parameters of the GPU, namely the temperature limit, power limit, voltage offset and what intel calls the performance boost.

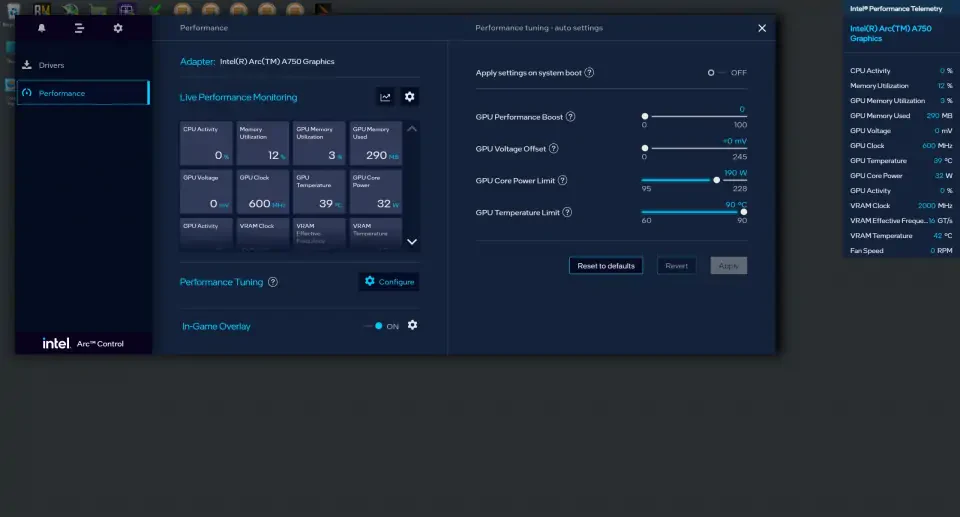

The power limit of the GPU core can be increase to 228 W from a default 190 W and the voltage offset allows for a boost of up to +261 mV, which is actually quite a lot and I am really excited to see how this works in practice.
The performance boost slider is Intels way of changing the GPU core clock just in an abstracted way. The Arc A750 and other Arc GPUs do follow a defined voltage/frequency curve (or v/f curve). This means that voltages and frequencies vary constantly depending on the current power draw and temperature of the card. Increasing the performance boost in the Arc Control software effectively shifts said v/f curve up and therefore results in an increased core clock across all voltages.
Arc Control is implemented as an overlay only, so you can't drag it around like a typical application. It felt weird at first but having used the overlay a bit more I find it quite convenient to be able to just spawn it over any full-screen application and tweak the GPU settings.
Overclocking with the performance slider
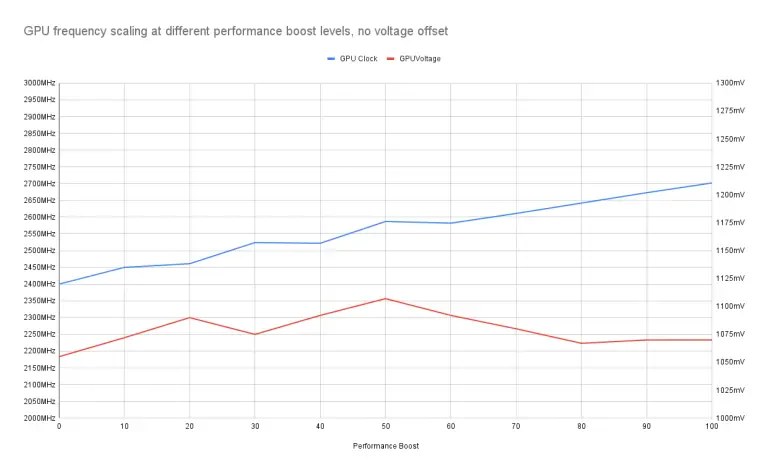
To get a better understanding of the v/f curve and the performance boost behavior of the card, I set the power limit slider to the highest possible value of 228 W and let the Unigine Heaven benchmark run at a 720p resolution in the background. With the lower resolution the benchmark does draw less power so I can utilize more of the power budget for overclocking. I started to increase the performance boost slider step by step and observed the frequency and voltage levels.


| Performance Boost | Core Clock | Core Voltage |
|---|---|---|
| 0 | 2400 MHz | 1052 mV |
| 10 | 2450 MHz | 1072 mV |
| 20 | 2461 MHz | 1090 mV |
| 30 | 2524 MHz | 1075 mV |
| 40 | 2522 MHz | 1092 mV |
| 50 | 2587 MHz | 1107 mV |
| 60 | 2582 MHz | 1092 mV |
| 70 | 2611 MHz | 1080 mV |
| 80 | 2642 MHz | 1067 mV |
| 90 | 2673 MHz | 1070 mV |
| 100 | 2702 MHz | 1070 mV |
Increasing the performance boost slider 10 steps does yield a frequency gain of about 30 MHz on average, but it is not consistent across the full performance boost spectrum. It's also worth noting that the core voltage also changed slightly, ranging from 1052 mV without a performance boost, to up to 1107 mV using a value of 50 on the performance boost slider.
Changing the core voltage with the voltage offset slider
I went on to repeat my test, but this time changing only the voltage offset slider without any additional performance boost and the results may be unexpected for some.

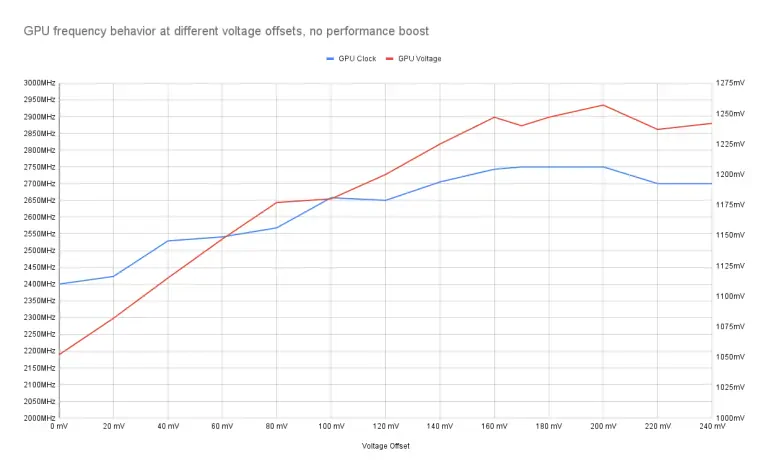

| Voltage Offset | Core Clock | Core Voltage | actual voltage offset |
|---|---|---|---|
| +0 mV | 2400 MHz | 1052 mV | +0 mV |
| +20 mV | 2423 MHz | 1082 mV | +30 mV |
| +40 mV | 2529 MHz | 1115 mV | +63 mV |
| +60 mV | 2541 MHz | 1147 mV | +95 mV |
| +80 mV | 2568 MHz | 1177 mV | +125 mV |
| +100 mV | 2658 MHz | 1180 mV | +128 mV |
| +120 mV | 2650 MHz | 1200 mV | +148 mV |
| +140 mV | 2705 MHz | 1225 mV | +173 mV |
| +160 mV | 2743 MHz | 1247 mV | +195 mV |
| +180 mV | 2750 MHz | 1247 mV | +195 mV |
| +200 mV | 2750 MHz | 1257 mV | +205 mV |
| +220 mV | 2700 MHz | 1237 mV | +185 mV |
| +240 mV | 2700 MHz | 1242 mV | +190 mV |
You can clearly see in the chart that with a voltage offset applied, not only the core voltage gets a boost but also the core frequency increases as you add more voltage. This is due to the behavior of the GPU to follow a defined voltage/frequency curve. It is very import to keep this in mind during overclocking because it can feel a little bit counter intuitive at times.
Let's say you start overclocking your Arc GPU and raise the performance slider until you experience some instability. Intuitively, you would want to raise the voltage slider to get better stability again, like you would do on any other GPU. But, when applying a voltage offset, you would also push the frequency higher due to the behavior of the card to follow a defined v/f curve. As a result of that, your stability ins't likely to increase. In order to get better stability, you would have to reduce the performance boost slider as you raise the voltage offset to keep the frequency at the same level.
Combining performance boost and voltage offset
Knowing the behavior of the card, we can easily combine both the performance boost and voltage offset slider to dial in an effective overclock depending on the particular workload. I tried to pair the most common combinations while again running Unigine Heaven at 720p in the background representing a light workload.

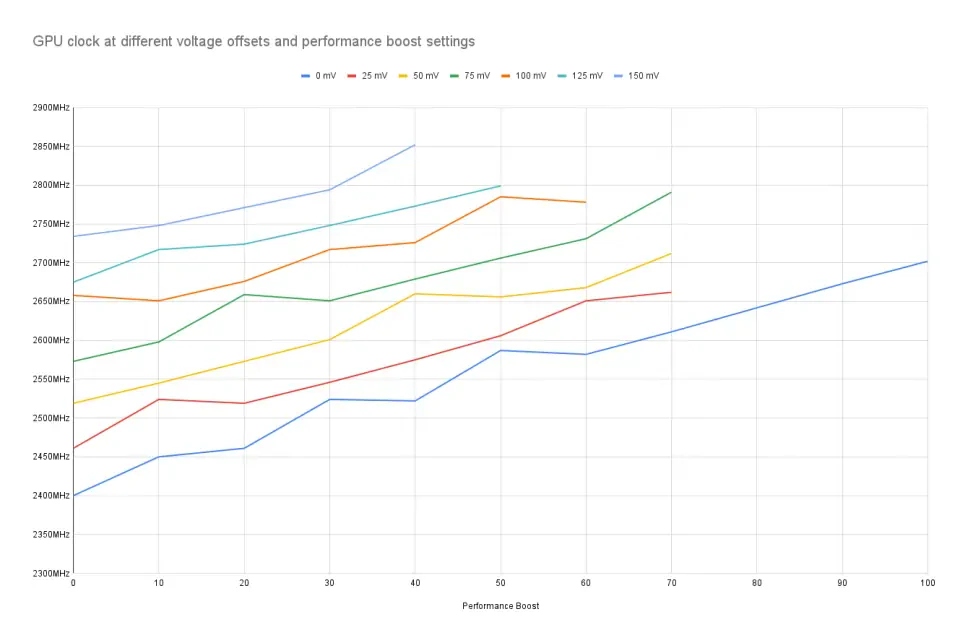

| Perf. Boost | 0 mv | 25 mv | 50 mv | 75 mv | 100 mV | 125 mV | 150 mV |
|---|---|---|---|---|---|---|---|
| 0 | 2400 | 2461 | 2519 | 2573 | 2658 | 2675 | 2734 |
| 10 | 2450 | 2524 | 2545 | 2598 | 2651 | 2717 | 2748 |
| 20 | 2461 | 2519 | 2573 | 2659 | 2676 | 2724 | 2771 |
| 30 | 2524 | 2546 | 2601 | 2651 | 2717 | 2748 | 2794 |
| 40 | 2522 | 2575 | 2660 | 2679 | 2726 | 2773 | 2852 |
| 50 | 2587 | 2606 | 2656 | 2706 | 2785 | 2799 | |
| 60 | 2582 | 2651 | 2668 | 2731 | 2778 | ||
| 70 | 2611 | 2662 | 2712 | 2791 | |||
| 80 | 2642 | ||||||
| 90 | 2673 | ||||||
| 100 | 2702 |
Offsetting the voltage by 25 mV results in an average frequency gain of roughly 50 MHz, although being not very consistent across the full performance boost spectrum. I haven't tested all these values for stability as I just wanted to observe the behavior of the card. A lot of configurations weren't stable at all, so I couldn't observe a frequency. Also please note that I specifically used a lighter load for this test to see the highest possible frequency the card tries to run. The core clock achieved during more demanding workloads will definitely be below the values I have got here. To put this in perspective, I was barely able to finish a round of 3DMark Time Spy at above 2600 MHz while pushing almost 2800 MHz during a full Unigine Heaven run at 720p.
Still, I find it quite impressive to see a frequency of over 2850 MHz on this card (although it crashed immediately) and I get quite excited when I think about what this card could do with better cooling and a higher power limit.
Overclocking results
After having spent quite some time running different combinations of performance boost and voltage offsets, I tried to find my best possible overclock settings and see how much I could improve versus my initial scores.
| 3DMark Time Spy | Unigine Heaven | |
|---|---|---|
| Benchmark Score | 12817 (+4.8 %) | 2933 (+7 %) |
| Performance Boost | +50 | +40 |
| Voltage Offset | +25 mV | +100 mV |
| Max. core clock | 2606 MHz (+8.6 %) | 2726 MHz (+13.6 %) |
| Avg. core clock | 2603 MHz (+9.0 %) | 2718 MHz (+13.4 %) |
| Max. power draw | 233 W (+20.7 %) | 227 W (+34.3 %) |
| Avg. power draw | 221 W (+18.8 %) | 205 W (+30.6 %) |
The 3DMark Time Spy score improved by less than 5 %, but is loading the A750 way harder in terms of power draw. Therefore the GPU had less headroom for higher voltages and higher core clocks. On the other side, Unigine Heaven could improve a little bit more with a performance gain of about 7 %. The improvements may not seem like much, but keep in mind that only the GPU core can be overclocked and no memory overclocking is possible.
If you are not planning to tear apart your card and modify the PCB or cooler, then this is as far as it goes regarding overclocking the Arc A750 Limited Edition.
4. Tear-Down and PCB Overview
At this point, some modifications will be necessary to push the card to even higher frequencies. There are two problems at the moment preventing higher clock speeds. First, there isn't much headroom left regarding the GPU temperature, reaching over 80°C when overclocked and second, the power limit is completely maxed out. In order to solve those problems we need to disassemble the card and have a closer look at the PCB and the cooler.
Tearing down the card is slightly more complicated than most graphics cards I've worked on, but once you have removed the glued on back-plate it's relatively straight forward.

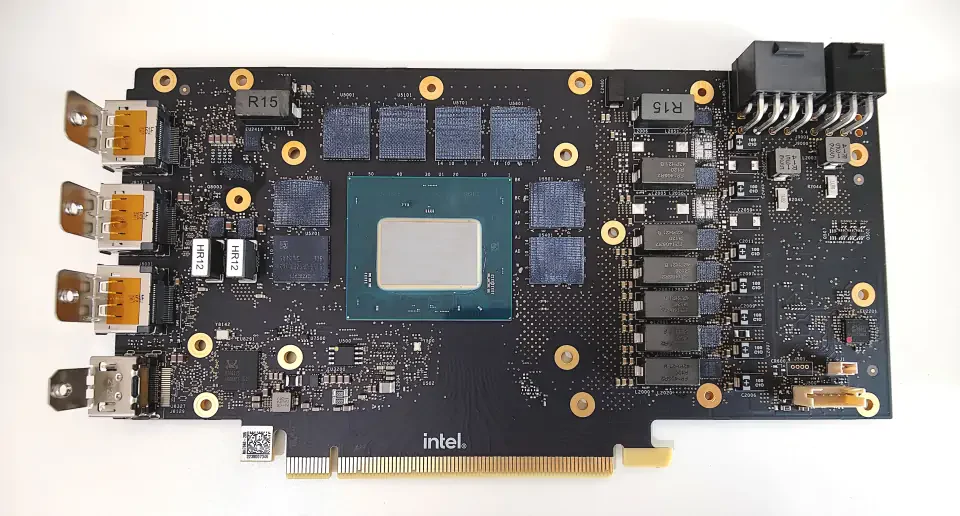


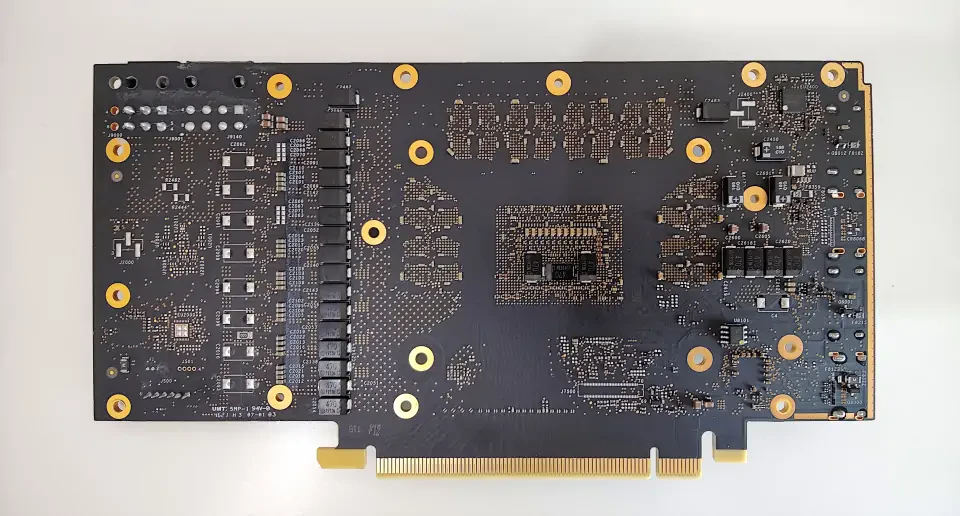

The A750 Limited Edition uses a MP2979A controller for both the VCORE and memory VRM. There is no public datasheet available for the MP2979A controller.

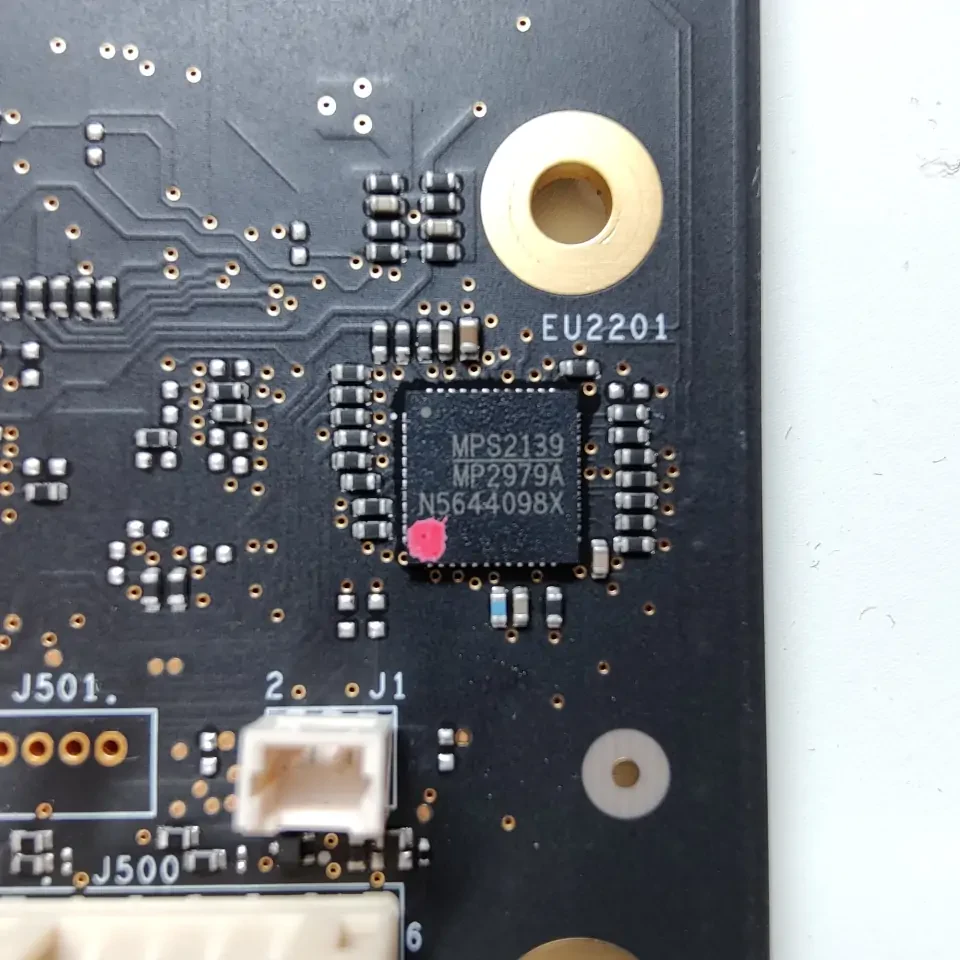


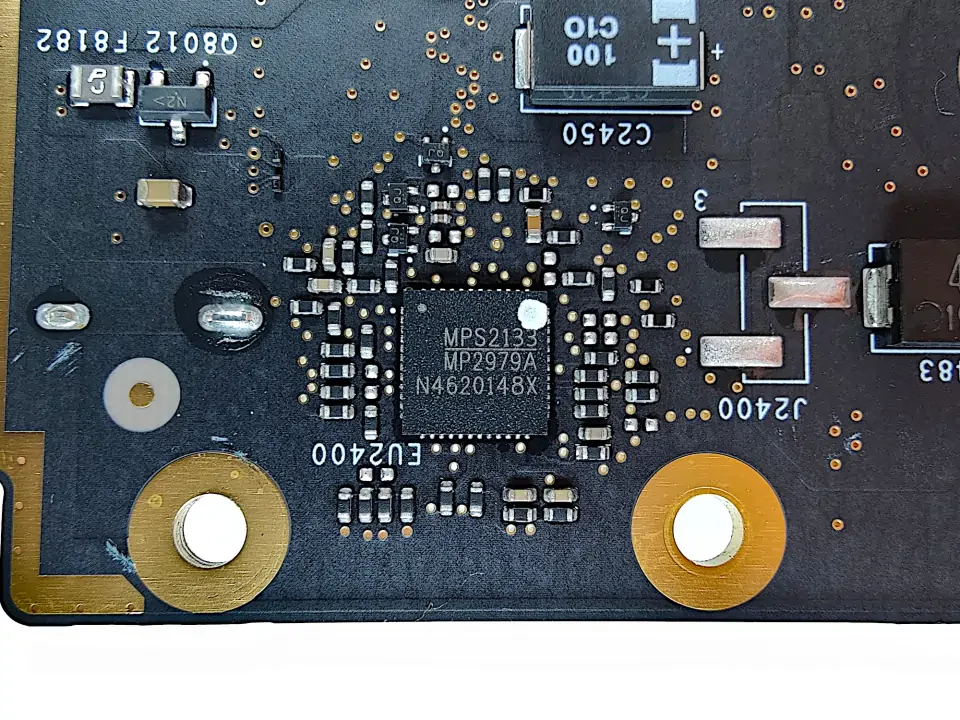

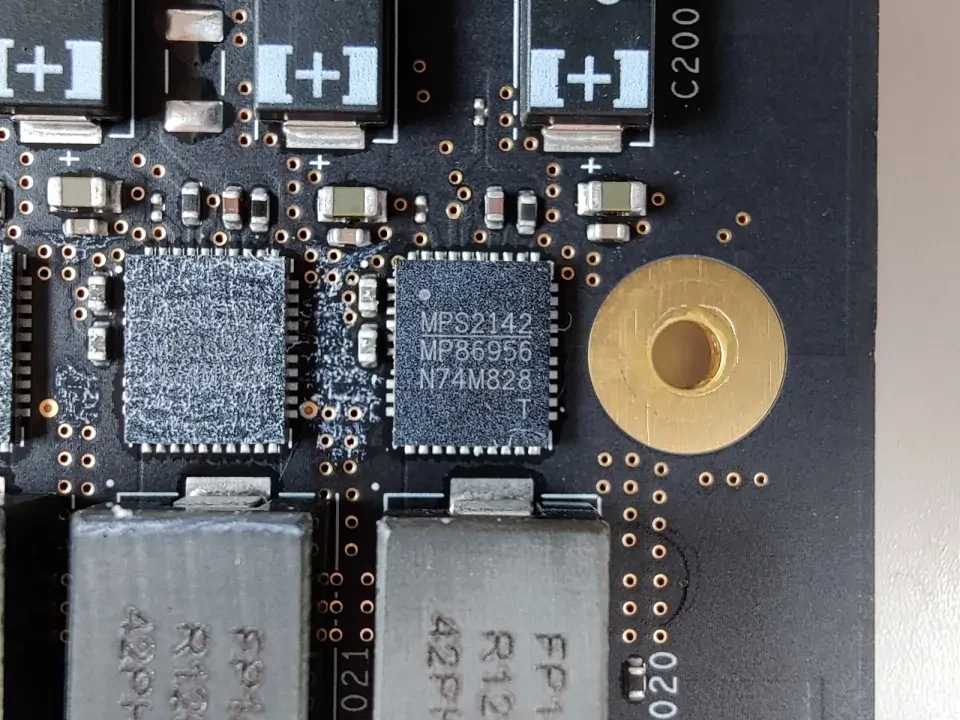
Power delivery for the GPU core is implemented using a six-phase design with MP86956 integrated power stages. The MP86956 is rated for 70A of continues output current which is sufficient for the typical power requirements of the A750.


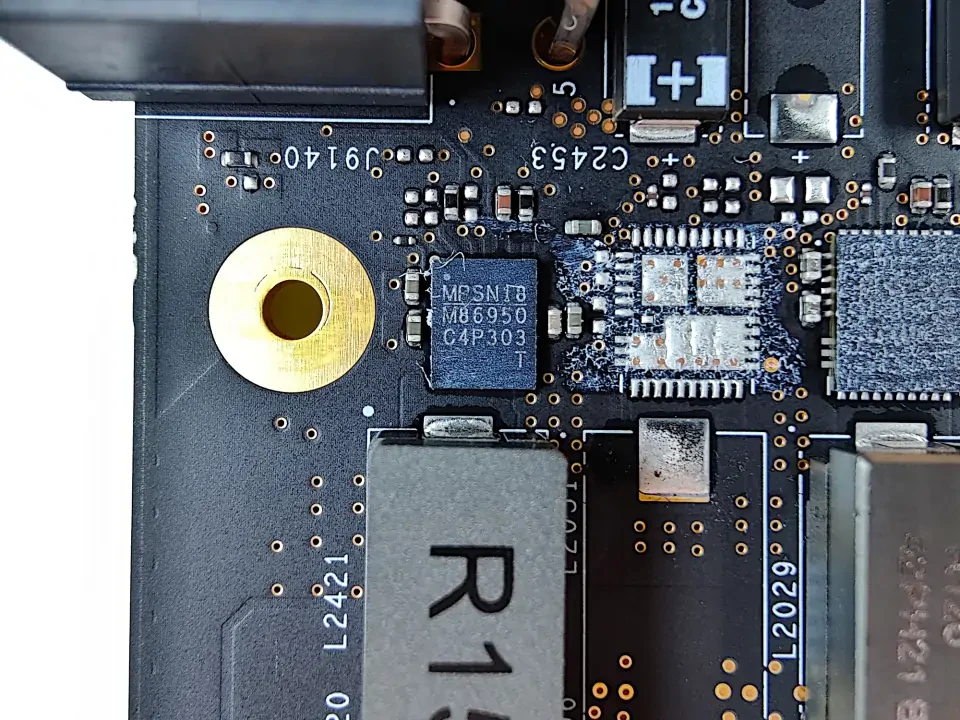
The two-phase memory VRM uses MP86950 power stages rated for 50A of continues output current.


5. Increasing the power limit
Looking at the PCB we can see that there are two current sense resistors used for power measurements. This means it should be possible to falsify the power reading of the GPU if we can reduce the resistance of said resistors.

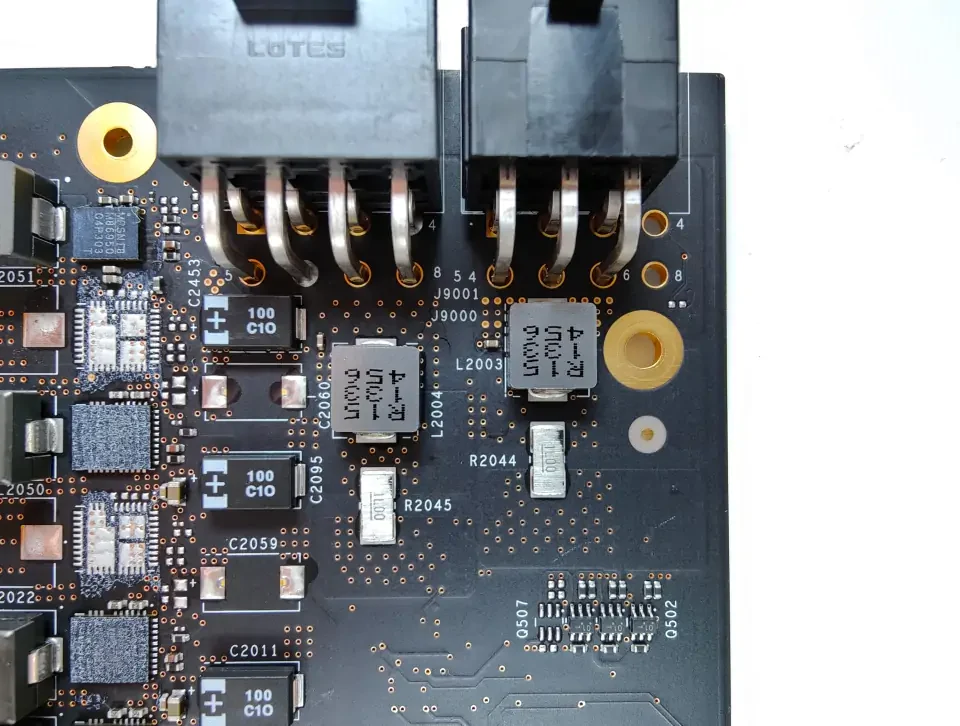

I couldn't find the exact parts used, but these resistors should have a resistance of somewhere between 0.5 and 1.5 mOhm. They are also smaller than the typical shunt resistors NVIDIA uses on their cards. In order to reduce the resistance we can place another shunt resistor in parallel (on top) to the existing ones.
I attempted the modification using 1.5 mOhm resistors from elmorlabs.com. These resistors are slightly larger than the existing ones on the A750, so it's harder to get proper contact to the solder pads on the PCB. Although I managed to solder the resistors on top of the others, I didn't see any improvements regarding the power limit.
I suspect that this is due to using too large resistors in the first place and maybe also a poor execution of the solder job. There should be other methods to work around the power limit through software, as this has already been done on the Arc A380 by SkatterBencher.
Unfortunately, my attempt to increase the power limit failed so I have to work out an alternative solution and come back once I have managed to get it done right. With the power limit issue unresolved, I went on the tackle the GPU temperature problem.
6. Improving the GPU Temperature
With the lack of fan control through the ARC Control software, there aren't many options available to get better GPU core temperatures. There is a full-cover waterblock from EK but it is crazy expensive and simply not justifiable for my use-case. I was also thinking to maybe adapt the fan header to allow connecting it to a 4-Pin header on the motherboard, but in the end I opted for an alternative solution.
I created a custom waterblock for the A750 using an EK-Supremacy MX Copper base and a 3D printed top cover that I designed myself.

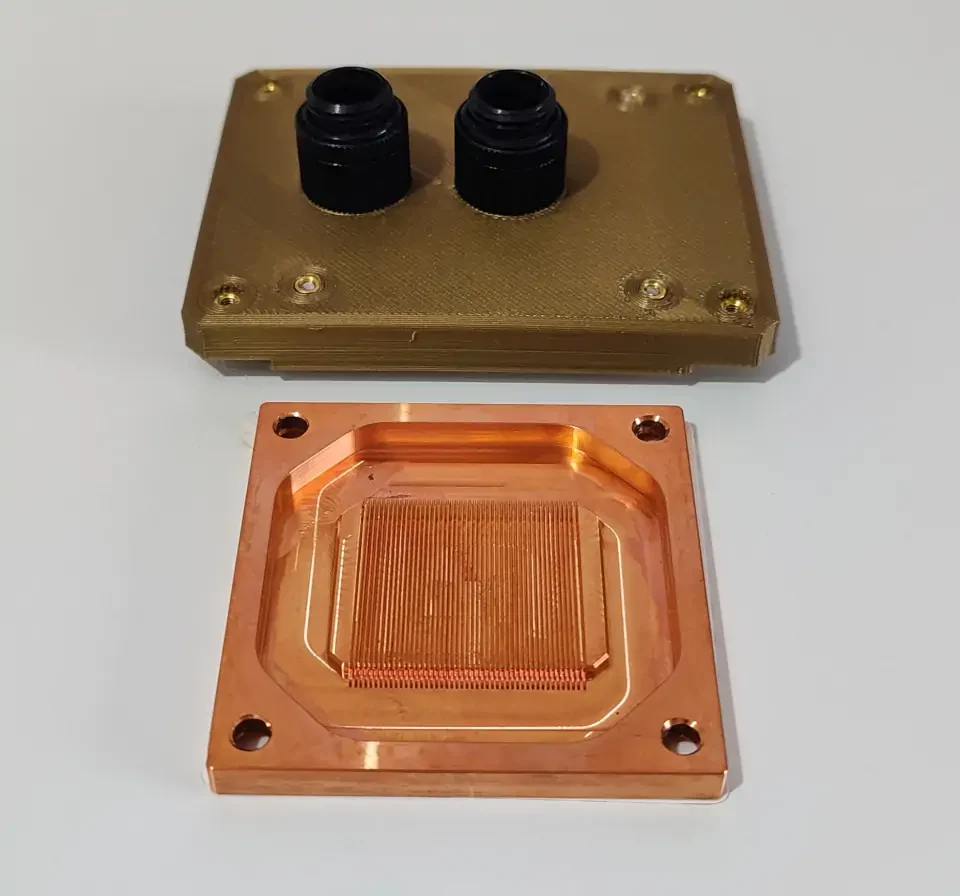


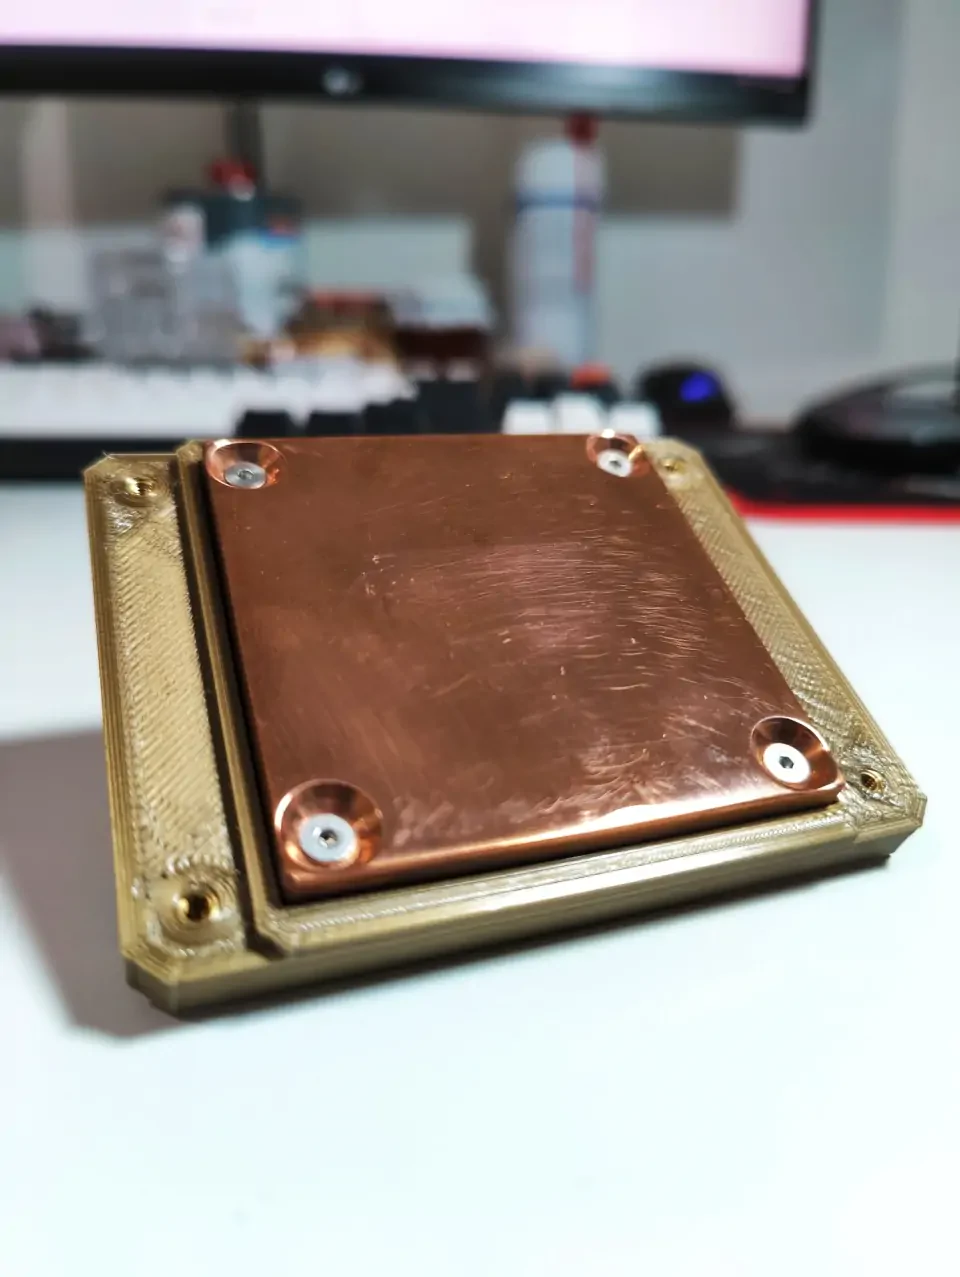


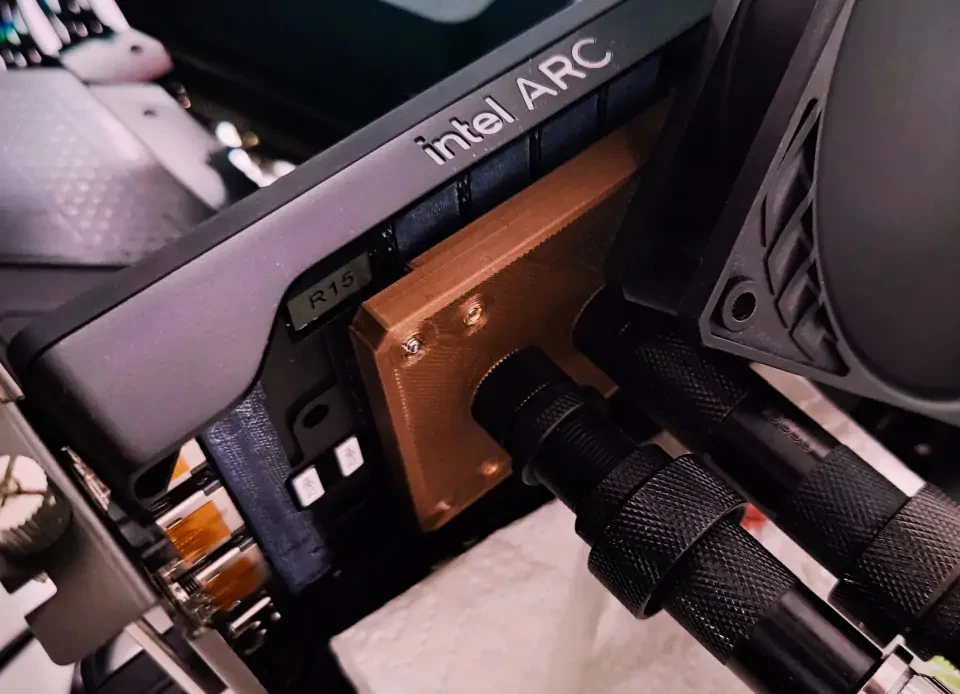

The block may not look like much and yes, it's only a very rough prototype to get the job done, but it was really cheap to produce with a total cost of less than EUR 15,00.
Using the waterblock prototype the GPU core temperature stayed below 40°C at all times, having an ambient temperature of about 22°C. The temperature of the GDDR6 modules using the waterblock is just 5-10 degrees hotter than with the stock air cooler which is still totally acceptable.
Overall I am very happy with the performance of the waterblock and it's much better than what would be possible with the stock air cooler.
Overclocking the A750 with watercooling
Watercooling the card resulted in a significant clock speed boost in both Unigine Heaven and 3DMark Time Spy.
| 3DMark Time Spy | Unigine Heaven | |
|---|---|---|
| Benchmark Score | 12914 (+5.3 %) | 3029 (+10.6 %) |
| Performance Boost | 72 | 72 |
| Voltage Offset | +30 mV | +105 mV |
| Max. core clock | 2675 MHz (+11.4 %) | 2851 MHz (+18.8 %) |
| Avg. core clock | 2674 MHz (+12 %) | 2849 MHz (+18.9 %) |
| Max. power draw | 230 W (+19.1 %) | 229 W (+35.5 %) |
| Avg. power draw | 211 W (+13.4 %) | 209 W (+33.1 %) |
3DMark Time Spy improved by another 71 MHz on average while the A750 was 131 MHz faster in Unigine Heaven which is really impressing given the card runs on the same unchanged power budget. I also did a maximum frequency test with Unigine Heaven and was able to run the card at 2900 MHz for about halfway through the benchmark before it crashed.

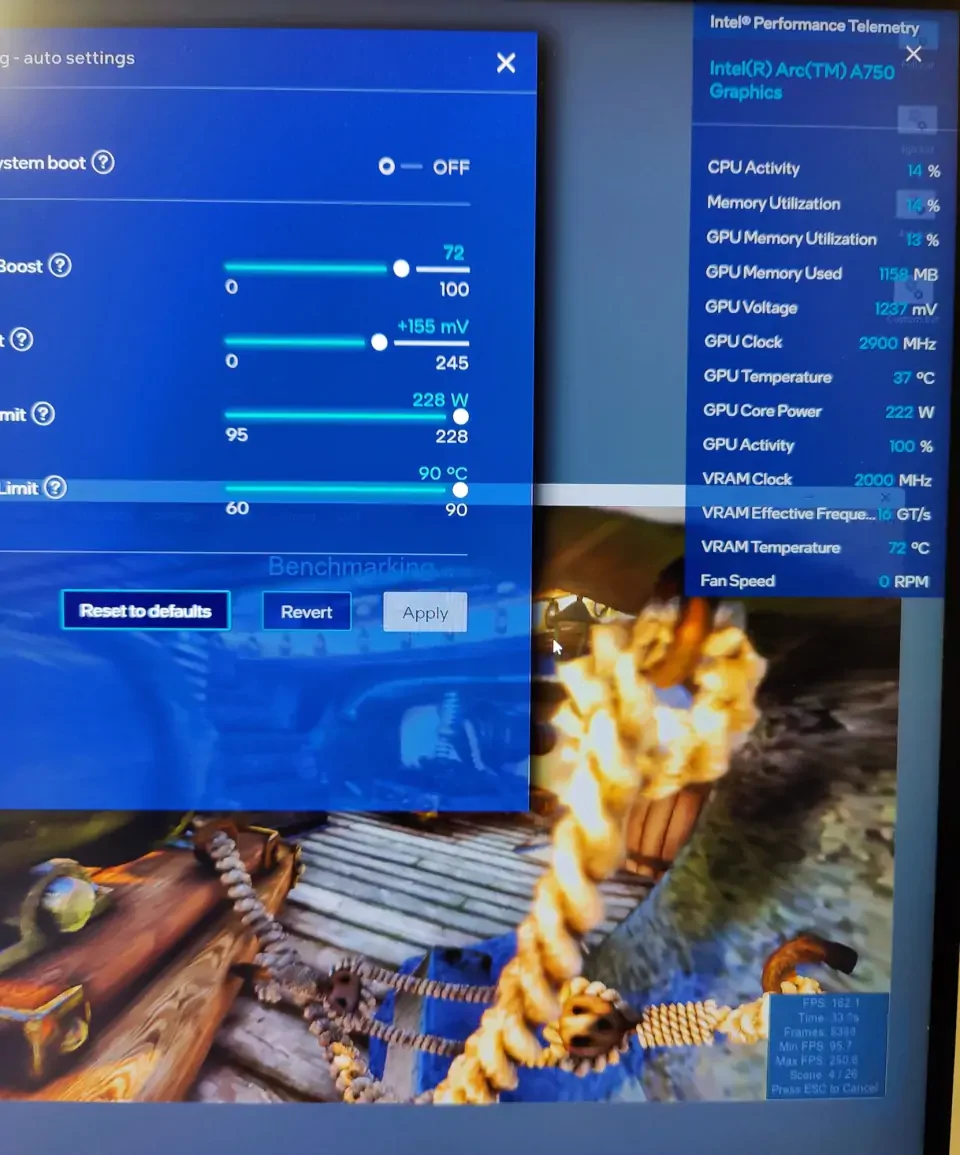

The 228 watt power limit is still heavily limiting the card in both tests and prevents higher voltages for further clock improvements. The voltage during the Unigine Heaven run stayed at an almost constant 1205 mV.
7. Final words
Overclocking the Arc A750 Limited Edition from Intel is different, but overall works quite well. I was not expecting to hit clock speeds beyond 2800 MHz or even 2900 MHz with the unresolved power limit bottleneck. I believe with a higher power budget it's possible to get 2900 MHz through some benchmarks. I also did like the overall build quality and the simple design of the Arc A750 Limited Edition, except the glued on backplate.
Not being able to overclock the cards memory and changing the fan speed at all however is pretty disappointing however and I hope Intel delivers these features at some point in the future. The stock air cooler is sufficient for basic overclocking but quickly reaches it's limits once the card is overvolted.
Arc Control is easy to use and works ok once you are used to it. The sliders for the performance adjustments could be implemented better in my opinion, as they do not allow for very granular adjustments, especially for the GPU core clock. Increasing the performance boost slider by one step can result in a frequency gain anywhere between 1-50 MHz which isn't very predictable.
Hopefully I can find out how to resolve the remaining power limit bottleneck to fully utilize the voltage offset capabilities of the card and post an update soon.



Comments (3)